How to Show Tools in Photoshop and Locate Them Fast
Knowing how to show tools in Photoshop is the fastest way to boost your editing speed and confidence. The Photoshop toolbar holds dozens of tools, and many hide behind small arrows. You can reveal them, customize your workspace, and use keyboard shortcuts to find any tool in seconds. This guide walks you through every method step by step.
Photoshop can feel overwhelming when you first open it. Dozens of icons crowd the left side of your screen, and some tools hide behind others. If you have ever wondered how to show tools in Photoshop and find them quickly, you are in the right place. This guide covers every method you need to access, locate, and organize your Photoshop tools with confidence.
Whether you are a beginner just learning the ropes or a seasoned editor looking to speed up your workflow, understanding your Photoshop tools panel is essential. The good news is that once you know where things are, everything becomes much easier. Let us dive in and explore the simplest ways to show tools in Photoshop and make your editing life smoother.
Key Takeaways
- Toolbar Access: The main toolbar lives on the left side of your Photoshop screen and holds all essential editing tools.
- Hidden Tools: Many tools nest inside others, and you can reveal them by clicking and holding or using the small arrow icon.
- Workspace Customization: You can reset, save, and customize your Photoshop workspace to show only the tools you need.
- Keyboard Shortcuts: Using shortcuts is the fastest way to locate and switch between tools without hunting through the toolbar.
- Tool Options Bar: The options bar at the top changes depending on which tool you select and gives you extra controls.
- Reset Workspaces: If your tools go missing, resetting the workspace is a quick fix that restores the default layout.
📑 Table of Contents
- Understanding the Photoshop Toolbar Layout
- How to Show Hidden Tools in Photoshop
- Customizing Your Photoshop Workspace
- Using the Tool Options Bar for Extra Controls
- Keyboard Shortcuts to Show and Access Tools Fast
- Common Problems When Tools Go Missing and How to Fix Them
- Quick Tips for Mastering Photoshop Tools
Understanding the Photoshop Toolbar Layout
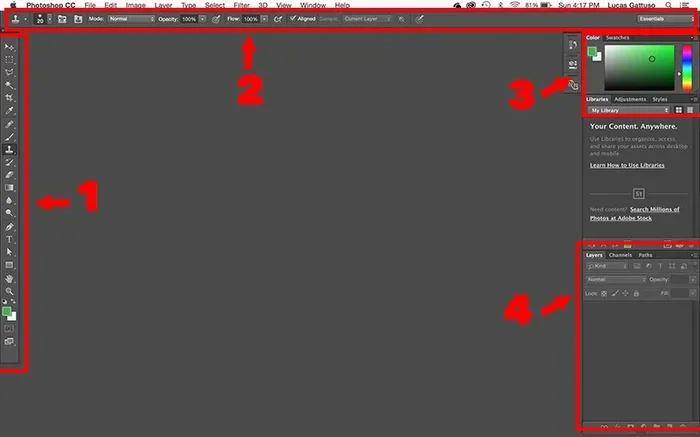
The Photoshop toolbar sits on the left side of your screen by default. It is also called the tools panel or the Photoshop sidebar. This vertical column holds all the core editing tools you will use every day. Each icon represents a different tool, and some icons hide additional tools underneath them.
The toolbar is divided into several groups. You have selection tools, painting tools, drawing tools, text tools, and navigation tools. Each group shares a similar icon style so you can spot them quickly. The topmost tools in each group are the ones you see first, and the rest are hidden until you expand them.
What Each Toolbar Section Does
Here is a quick breakdown of what you will find in each section of the Photoshop toolbar:
- Selection Tools: These let you select parts of your image. Think of the Move tool, the Marquee tools, and the Lasso tools.
- Crop and Slice Tools: These help you trim your canvas or divide your image into sections.
- Measuring and Navigation Tools: These include the Eyedropper, Hand, and Zoom tools for inspecting your image.
- Retouching and Painting Tools: This is the biggest group. It includes the Brush, Eraser, Clone Stamp, and Healing Brush tools.
- Drawing and Type Tools: These cover the Pen tool, Shape tools, and the Type tool for adding text.
Knowing what each section does helps you find tools faster. Instead of clicking randomly, you can go straight to the group you need. This alone will save you a lot of time during your editing sessions.
How to Show Hidden Tools in Photoshop
Here is one of the most useful tricks in Photoshop. Many toolbar icons actually contain multiple tools stacked inside them. You can see a small arrow in the bottom-right corner of the icon. That arrow means there are hidden tools waiting to be revealed.
To access these hidden tools, simply click and hold on any icon that has this arrow. A flyout menu will pop up showing all the tools tucked inside. You can then click on the one you want to use. This is how you access tools like the Rectangular Marquee and the Single Row Marquee, which share the same icon spot.
The Quick Way to Cycle Through Hidden Tools
If you use a specific hidden tool often, there is an even faster method. Press and hold the Shift key and tap the letter key for the parent tool. For example, the Move tool uses the letter V. Pressing Shift + V cycles through all tools in that group. This trick works for almost every toolbar icon with hidden tools behind it.
Another method is to right-click on the icon. This opens the same flyout menu without having to click and hold. Some people find this easier, especially if they have a mouse with a right-click button. Either way, you now know two reliable ways to show hidden tools whenever you need them.
Customizing Your Photoshop Workspace
Photoshop lets you customize your entire workspace. This means you can choose which panels and tools are visible and which are hidden. If your screen feels cluttered, you can simplify it. If you need more space for your image, you can collapse panels you do not use often.
Customizing your workspace is one of the best ways to make Photoshop feel like your own. You can save your custom layout and switch between workspaces depending on the task at hand. For example, you might have one workspace for photo editing and another for graphic design.
How to Reset Your Workspace
Sometimes things get messy and you just want to start fresh. Photoshop makes this easy. Go to the Window menu at the top of your screen, then hover over Workspace. Click on Reset Essentials to restore the default layout. This will bring back all the default panels and tool positions.
If your tools are missing or your panels are scattered, resetting the workspace is the fastest fix. It takes just a few seconds and puts everything right back where it should be. This is especially helpful if you accidentally close a panel and do not know how to get it back.
Saving Your Custom Workspace
Once you have your tools and panels arranged the way you like them, save the layout. Go to Window, then Workspace, and click Save Workspace. Give it a name that makes sense to you, like Photo Editing or Quick Access. Next time you need that setup, you can load it with one click.
This is a great habit to build. Over time, you will have multiple workspaces for different projects. Switching between them takes seconds and keeps your workflow smooth and efficient.
Setting up your workspace properly is similar to organizing any creative workstation. Just like knowing how to power your house with a generator keeps your tools running, keeping your Photoshop workspace organized keeps your editing workflow running without interruptions.
Using the Tool Options Bar for Extra Controls
Directly above the toolbar, you will see the Tool Options Bar. This horizontal bar changes depending on which tool you have selected. It shows you all the settings and options for that specific tool. For example, if you select the Brush tool, the options bar lets you choose the brush size, hardness, and opacity.
The options bar is incredibly useful because it puts all the important controls right at the top of your screen. You do not have to hunt through menus to find what you need. This is one of the reasons professional editors love Photoshop. Everything is right there, ready to use.
How to Move or Hide the Options Bar
If the options bar is taking up too much space, you can move it. Click on the left side of the options bar and drag it to a different position. You can dock it to the top, the side, or even float it as a separate window.
To hide the options bar temporarily, go to the Window menu and uncheck Options Bar. This gives you more vertical space for your canvas. When you need it back, just go to Window and check Options Bar again. It is that simple.
Keyboard Shortcuts to Show and Access Tools Fast
This is the single most important section of this guide. Keyboard shortcuts are the fastest way to show and switch tools in Photoshop. Once you memorize a few essential shortcuts, you will never want to click through the toolbar again.
Every tool in Photoshop has a single-letter shortcut. Here are the most important ones you should learn right away:
- V: Move Tool
- M: Marquee Tools (press Shift + M to cycle through them)
- L: Lasso Tools (press Shift + L to cycle)
- W: Magic Wand and Quick Selection tools
- B: Brush Tool
- E: Eraser Tool
- T: Type Tool
- Z: Zoom Tool
- H: Hand Tool
- C: Crop Tool
Notice how pressing Shift along with the letter key cycles through hidden tools in each group. This one trick alone will make you much faster in Photoshop. Practice these shortcuts daily until they become second nature.
Customizing Keyboard Shortcuts
Photoshop lets you create your own keyboard shortcuts. Go to Edit, then Keyboard Shortcuts. From there, you can assign any key combination to any tool. This is especially helpful if you use certain tools frequently and want them even easier to access.
Just be careful not to overwrite shortcuts you already use. Photoshop will warn you if a shortcut is already assigned to another command. Take some time to plan your custom shortcuts so they make sense and do not conflict with your existing workflow.
Think of keyboard shortcuts like the electrical setup in your workspace. Just as you need to know how to wire a generator to a breaker box to keep things running smoothly, knowing your Photoshop shortcuts keeps your editing workflow flowing without interruptions.
Common Problems When Tools Go Missing and How to Fix Them
Sometimes tools or panels disappear in Photoshop, and it can be frustrating. The good news is that this almost always has a simple fix. Here are the most common reasons your tools might be missing and how to bring them back.
The Toolbar Is Minimized
Photoshop lets you collapse the toolbar to save screen space. If you only see a thin column of icons on the left, the toolbar is minimized. Click the double arrows at the top of the toolbar to expand it back to full size. You can also double-click the toolbar title bar to toggle between expanded and collapsed views.
A Panel Was Accidentally Closed
If you closed a panel like Layers or Properties and cannot find it, go to the Window menu. All available panels are listed there. Simply click on the panel name to reopen it. This works for any panel that goes missing, including the tools panel itself.
The Workspace Was Changed
If someone else used your computer or if you accidentally switched workspaces, your layout might look completely different. Go to Window, then Workspace, and select Essentials to return to the standard layout. You can also reset the workspace as we discussed earlier.
Display Scaling Issues
On high-resolution screens, Photoshop sometimes scales the interface in a way that makes tools appear smaller or harder to see. Go to Edit, then Preferences, then Interface. Adjust the UI Scaling setting to make everything larger and easier to read. This is especially helpful on 4K and Retina displays.
Dealing with missing tools is much like troubleshooting any equipment setup. Whether you are figuring out what size generator to run power tools in your studio or fixing a missing Photoshop panel, the solution is usually straightforward once you know where to look.
Quick Tips for Mastering Photoshop Tools
Here are some bonus tips to help you master your Photoshop tools faster:
- Use the Search Bar: Photoshop has a search bar at the top of the workspace. Type the name of any tool, and Photoshop will highlight it in the toolbar for you.
- Toggle Tool Tips: Hover over any tool icon to see its name and shortcut in a tooltip. This is a great way to learn new shortcuts on the fly.
- Use the Eyedropper Shortcut: Press I to quickly switch to the Eyedropper tool, pick a color, and then press the previous tool key to go back.
- Lock Your Toolbar: Go to Edit, then Preferences, then Tools, and check the box to lock the toolbar. This prevents accidental changes to your layout.
- Practice Daily: Spend just 10 minutes a day practicing shortcuts and tool navigation. Consistency is the key to building muscle memory.
These small habits add up over time. Before you know it, you will be navigating Photoshop like a pro without even thinking about it.
Remember, showing tools in Photoshop is not complicated once you understand the basics. The toolbar, the options bar, keyboard shortcuts, and workspace customization all work together to give you fast access to every tool you need. Start by learning the basic shortcuts, then explore workspace customization to build a setup that fits your style.
Keep practicing, keep experimenting, and do not be afraid to reset your workspace if things get messy. Photoshop is a powerful tool, and the more comfortable you become with its interface, the more creative you can be. Happy editing!
Frequently Asked Questions
Why are some tools hidden in the Photoshop toolbar?
Photoshop groups related tools together to save space. Tools that share a similar function are stacked under one icon, and you can reveal them by clicking and holding or using the small arrow. This keeps the toolbar clean while still giving you access to all the tools you need.
How do I reset my Photoshop workspace if my tools are missing?
Go to the Window menu, hover over Workspace, and click Reset Essentials. This restores the default layout and brings back all panels and tools to their original positions. It takes just a few seconds and is the fastest way to fix a messy workspace.
What is the fastest way to switch between Photoshop tools?
Keyboard shortcuts are the fastest way to switch tools. Each tool has a single-letter key assigned to it. Pressing Shift along with the letter key cycles through hidden tools in that group. Learning the top 10 shortcuts will dramatically speed up your editing workflow.
Can I customize the Photoshop toolbar to show only certain tools?
Yes, you can customize the toolbar by going to Edit, then Toolbar. From there, you can drag tools between the toolbar and the extra tools section. This lets you create a streamlined setup with only the tools you use most often.
How do I find a tool if I forget its keyboard shortcut?
Use the search bar at the top of the Photoshop workspace. Type the name of the tool, and Photoshop will highlight it in the toolbar. You can also hover over any tool icon to see its name and shortcut in a tooltip.
What should I do if the Photoshop toolbar is too small to see properly?
Go to Edit, then Preferences, then Interface. Adjust the UI Scaling slider to make the toolbar and all interface elements larger. This is especially helpful on high-resolution or 4K monitors where everything might appear tiny.
=== CONCLUSION ===
Learning how to show tools in Photoshop does not have to be difficult. With the right approach, you can access any tool in seconds and keep your editing workflow fast and smooth. Start by familiarizing yourself with the toolbar layout, then practice the keyboard shortcuts until they feel natural. Customize your workspace to match your editing style, and do not hesitate to reset things if they get out of hand.
The key is consistency. The more you use Photoshop, the more intuitive the interface becomes. Soon, showing and locating tools will be something you do without even thinking about it. Apply the tips in this guide today, and you will notice a real difference in your editing speed and confidence. Keep creating and enjoy the process!