Is Pro Tools Easy to Use A Complete Beginner Guide
Is Pro Tools easy to use? The answer depends on your background and expectations. Pro Tools is a professional music production software built for audio editing and studio recording, which means it has a learning curve. However, with the right approach, beginners can navigate the Pro Tools interface, set up their first session, and start creating music within a few weeks. This guide breaks down everything you need to know about the Pro Tools learning curve, from workspace navigation to essential shortcuts that speed up your workflow.
So you have heard about Pro Tools and want to know if it is a good fit for you. Maybe you are a budding musician, a podcast creator, or someone who just wants to dip your toes into audio editing. The question on your mind is simple: is Pro Tools easy to use?
The honest answer is that Pro Tools is not the most beginner-friendly music production software on the market. It is a professional-grade Digital Audio Workstation, or DAW, used in studios around the world. But that does not mean it is impossible to learn. With the right guidance and a bit of patience, you can get comfortable with Pro Tools faster than you think.
This guide is designed for people who are brand new to Pro Tools for beginners. We will walk through the interface, the learning curve, session setup, essential features, and practical tips that make the whole experience smoother. By the end, you will have a clear picture of what to expect and how to get started on your Pro Tools journey.
Key Takeaways
- Pro Tools has a learning curve: It is not the simplest DAW for absolute beginners, but it is very manageable with consistent practice.
- The interface is modular: Once you understand the Edit window, Mix window, and Track Inspector, navigating becomes much easier.
- Keyboard shortcuts are game-changers: Learning just 10 to 15 shortcuts can dramatically speed up your editing and mixing workflow.
- Free learning resources exist: Avid offers official tutorials, and many YouTube channels provide step-by-step Pro Tools guidance for newcomers.
- Pro Tools is industry standard: Learning it opens doors to professional audio engineering and mixing and mastering careers.
- Start small and build up: Focus on recording, basic editing, and simple mixing before diving into advanced features like MIDI and plug-ins.
📑 Table of Contents
Understanding the Pro Tools Interface
The first time you open Pro Tools, the screen can feel intimidating. There are windows, menus, buttons, and panels everywhere. But here is the secret: the interface is organized into logical sections. Once you understand what each part does, everything starts to make sense.
The Main Windows You Will Work With
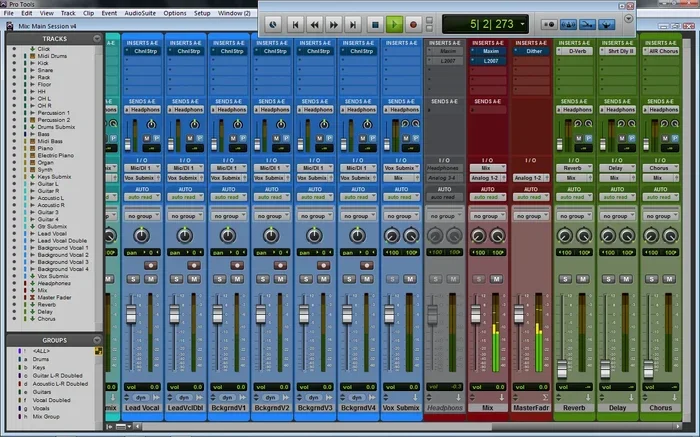
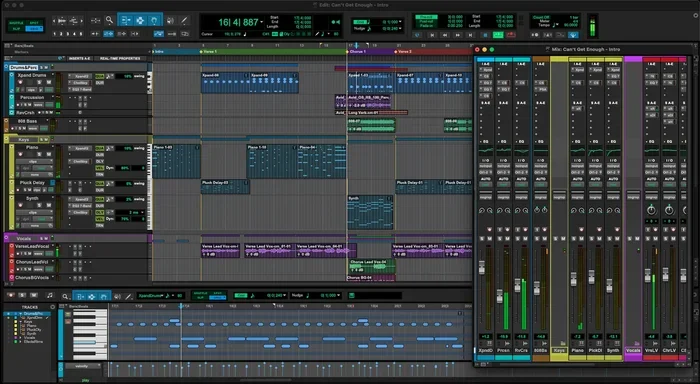
Pro Tools has several key windows that you will use constantly. The Edit window is where you do most of your work. This is where you see your audio tracks, arrange clips, and make edits. The Mix window is where you adjust levels, add effects, and balance your mixing and mastering chains. There is also the Track Inspector, which gives you quick access to plug-in settings, routing, and track properties.
At first, switching between these windows might feel awkward. But after a few sessions, you will naturally move between them without thinking. Think of it like learning to drive a car. The first few times, you check every mirror and pedal carefully. After a while, it becomes second nature.
Navigating the Toolbar and Menus
The toolbar sits at the top of the screen and gives you quick access to common tools. You will find selectors for the grabber tool, the selector tool, and the pencil tool. The menus above the toolbar contain nearly every function Pro Tools offers. The File menu handles saving and importing. The Edit menu handles cutting, copying, and pasting. The Mix menu handles automation and routing.
You do not need to memorize every menu item. Focus on learning the ones you use daily. As you grow more comfortable, you will naturally explore the deeper options. This is how Pro Tools basics build into real proficiency over time.
The Learning Curve: What to Expect
Let us talk about the Pro Tools learning curve honestly. Pro Tools was built for professional audio engineering and studio work. That means it includes features and workflows that are more advanced than what a casual user needs. But the good news is that you do not need to learn everything at once.
Why Pro Tools Feels Overwhelming at First
There are a few reasons why Pro Tools for beginners can feel challenging. First, the terminology is specific. Terms like “clips,” “regions,” “buses,” and “routing” have precise meanings in Pro Tools that might be different from what you have heard elsewhere. Second, the workflow is track-based and non-linear, which takes some getting used to if you have never used a DAW before.
Third, Pro Tools does not hold your hand as much as some other studio recording software options. There is no built-in assistant that walks you through every step. You have to learn by doing, which can be frustrating at times. But this hands-on approach is also what makes Pro Tools so powerful once you understand it.
How Long Does It Take to Learn Pro Tools?
This depends entirely on your goals and how much time you invest. If you practice for one to two hours a day, you can feel comfortable with basic recording and editing within two to three weeks. Reaching an intermediate level where you can mix tracks and use effects takes about two to three months of regular use.
The key is to set small, achievable goals. Do not try to learn everything in one sitting. Start with recording a single track. Then learn to cut and move clips. Next, try adding a simple effect. Each small win builds your confidence and skills. Before you know it, you will be navigating Pro Tools with ease.
Getting Started with Your First Pro Tools Session
Setting up your first session is one of the most important steps. A well-organized session saves you time and headaches later. Here is how to get started the right way.
Setting Up Your Session
When you open Pro Tools and create a new session, you will be asked to choose a sample rate and bit depth. For most beginners, 48 kHz and 24-bit is the sweet spot. It gives you high-quality audio without making your computer work too hard.
Next, set up your tracks. If you are recording vocals, create an audio track and assign it to your input. If you are working with virtual instruments, create a MIDI track and load a virtual instrument. Keep your session organized by naming every track clearly. Labeling tracks like “Vocals,” “Guitar,” and “Drums” might seem obvious, but it makes a huge difference when you have 20 or more tracks in your Pro Tools workspace.
Recording Your First Track
Recording in Pro Tools is straightforward once you know the basics. Arm the track by clicking the record button on the track header. Hit play, and start performing. When you are done, press stop and listen back. That is it. You have recorded your first track in Pro Tools.
Do not worry about making mistakes. You can always undo, comp different takes, or re-record. The beauty of digital recording is that you have unlimited chances to get it right. Experiment, have fun, and do not put pressure on yourself to sound perfect from day one.
Essential Features Every Beginner Should Know
Pro Tools has a lot of features, but not all of them are relevant to beginners. Here are the essential ones you should focus on first.
Editing Audio Clips
Audio editing is at the core of Pro Tools features. You can cut, copy, paste, fade, and move clips with ease. The grabber tool lets you move clips left or right on the timeline. The selector tool lets you highlight specific portions of audio. The scissors tool lets you split clips at any point.
One of the most useful editing techniques for beginners is crossfading. A crossfade smooths the transition between two clips so there is no awkward click or pop. To add a crossfade, simply overlap two clips and Pro Tools will automatically create a smooth transition. This small trick makes a big difference in the quality of your audio editing work.
Using MIDI and Virtual Instruments
If you want to create music without physical instruments, MIDI is your best friend. Pro Tools supports MIDI tracks that can trigger virtual instruments like keyboards, drums, and synths. You can draw MIDI notes using the pencil tool or record them in real time using a MIDI controller.
MIDI editing in Pro Tools is flexible and intuitive. You can adjust note length, velocity, and pitch after recording. This means you can fix mistakes without re-recording the entire part. For beginners interested in MIDI editing, start with a simple drum pattern and build from there.
Mixing Basics in Pro Tools
Mixing is where your individual tracks come together to sound like a cohesive song. In the Pro Tools Mix window, you adjust volume levels, pan tracks left or right, and apply effects like reverb, delay, and EQ.
Start with simple mixing. Balance the volumes so nothing is too loud or too quiet. Pan instruments to create a sense of space. Add a basic EQ to remove unwanted frequencies. These three steps alone will make your mix sound dramatically better. As you grow more confident, you can explore plug-ins and automation to add more depth and movement to your tracks.
Tips to Make Pro Tools Easier to Learn
Learning any new software is easier when you have smart strategies. Here are some tips that will help you master Pro Tools faster.
Keyboard Shortcuts That Save Time
One of the biggest secrets to working efficiently in Pro Tools is using keyboard shortcuts. Instead of clicking through menus for every action, you can use keys to speed up your workflow dramatically.
Here are some essential shortcuts to start with:
- Command + Z (Mac) or Ctrl + Z (Windows) to undo
- Command + Shift + S to save
- F12 to play
- Control + D to duplicate a clip
- Command + F to find and select
- B to zoom out
- Command + Plus to zoom in
Learn five shortcuts at a time. Practice them until they become muscle memory. Over a few weeks, you will notice how much faster and smoother your workflow becomes.
Free Resources for Learning Pro Tools
You do not have to figure Pro Tools out on your own. Avid, the company behind Pro Tools, offers free official tutorials on their website. These cover everything from basic setup to advanced mixing techniques.
YouTube is another goldmine for Pro Tools tutorial content. Channels dedicated to music production walk through real-world sessions step by step. Some popular topics include “Pro Tools for beginners,” “how to mix in Pro Tools,” and “Pro Tools keyboard shortcuts.” Watching someone else work through a session is one of the fastest ways to pick up new skills.
Also consider joining online communities. Forums and social media groups for Pro Tools users are full of helpful tips, troubleshooting advice, and encouragement. Being part of a community makes the learning process much more enjoyable.
Is Pro Tools Worth It for Beginners?
This is the question every beginner asks, and the answer is nuanced. Pro Tools is worth it if you are serious about audio engineering or want to work in a professional studio environment. It is the industry standard for a reason. But if you are just looking for a casual hobby tool, there might be simpler and cheaper options to explore first.
Pro Tools Pricing for New Users
Pro Tools offers different pricing tiers. The free version, Pro Tools Intro, gives you enough features to learn the basics. Pro Tools Artist is a mid-range option that adds more tracks and advanced features. The full Pro Tools version is the most powerful and expensive option. For most beginners, starting with Intro or Artist is a smart move. You can always upgrade later as your skills grow.
Studio Power and Equipment Considerations
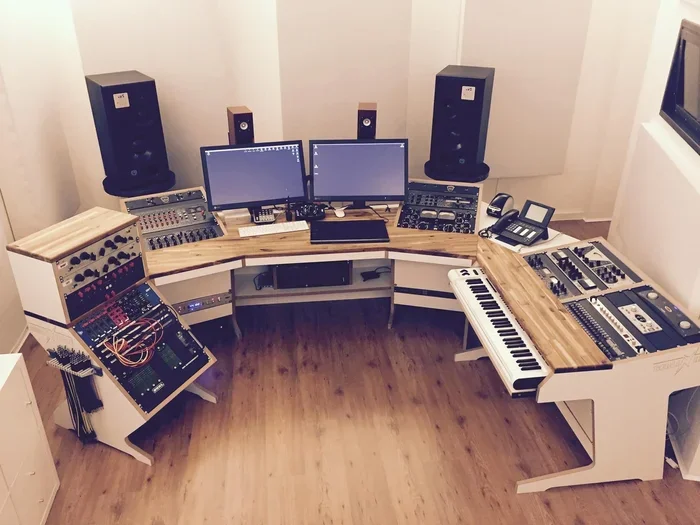
Running Pro Tools requires a reliable computer, an audio interface, studio monitors or headphones, and a quiet recording space. If you are setting up a home studio, you also need stable power. Some producers work in spaces where power reliability is a concern, especially in areas prone to outages. In those situations, you may want to consider a backup power solution. For example, you could look into how to power your studio equipment with a generator if you experience frequent power issues. Understanding how to power your house with a generator can help you protect your gear and keep your sessions running without interruption. You should also check what size generator fits your power needs, since a home studio setup is different from powering an entire household. And of course, running a generator continuously has costs, so it is worth learning how much gas a generator uses before committing to that kind of backup plan.
Beyond power considerations, your computer should meet Pro Tools system requirements. A machine with at least 8 GB of RAM, a decent multi-core processor, and a solid-state drive will run Pro Tools smoothly. Investing in good audio interface hardware also makes a big difference in sound quality and workflow.
Ultimately, is Pro Tools easy to use comes down to your commitment to learning. The software itself is powerful but demanding. If you invest the time, you will be rewarded with a tool that can compete with any professional studio in the world.
Conclusion
So, is Pro Tools easy to use? The short answer is yes, but with some effort. Pro Tools is a professional music production software that rewards patience and practice. The interface might feel complex at first, but once you understand the core windows, tools, and workflows, it becomes a natural extension of your creative process.
Start with the basics. Learn the Edit window and Mix window. Master a handful of keyboard shortcuts. Record your first track. Mix a simple session. Build your skills one step at a time. Do not compare your day-one progress to someone who has been using Pro Tools for years. Every expert was once a beginner.
The Pro Tools learning curve is real, but it is not insurmountable. With the right resources, a consistent practice routine, and a curious mindset, you can go from complete newcomer to confident user in just a few months. The world of audio engineering and studio recording is waiting for you. Jump in and start creating.
Frequently Asked Questions
Is Pro Tools hard to learn for absolute beginners?
Pro Tools has a steeper learning curve than some other DAWs, but it is not impossible to learn. Starting with the free Pro Tools Intro version and following step-by-step tutorials makes the process much easier. Most beginners feel comfortable within a few weeks of regular practice.
Can I use Pro Tools on a basic laptop?
You can, but performance depends on your hardware. Pro Tools works best on a computer with at least 8 GB of RAM, a multi-core processor, and a solid-state drive. A basic laptop can handle simple recording and editing, but complex sessions with many tracks may lag.
What is the difference between Pro Tools and other music production software?
Pro Tools is widely considered the industry standard for professional audio editing and mixing and mastering. Other DAWs like GarageBand or FL Studio are more beginner-friendly, but Pro Tools offers deeper control and is used in most commercial studios worldwide.
Do I need a music degree to use Pro Tools?
Absolutely not. Pro Tools is used by hobbyists, podcasters, and self-taught producers just as much as by professionals. You do not need formal training to get started. Free online tutorials and practice are all you need to build your skills.
How much does Pro Tools cost for a beginner?
Pro Tools Intro is free and gives you enough features to learn the basics. Pro Tools Artist costs around $99 and adds more tracks and advanced tools. The full version is more expensive but offers the complete feature set for professional work.
What are the best keyboard shortcuts to learn first in Pro Tools?
Start with the undo shortcut (Ctrl+Z or Cmd+Z), the save shortcut (Ctrl+S or Cmd+S), and the play shortcut (F12). These three will cover the most common actions you perform daily. Once those feel natural, add shortcuts for duplicating clips and zooming in and out.