How to Install RSAT Tools on Windows 11 Step by Step
Installing RSAT tools on Windows 11 is simple and free. This guide walks you through every method, from the Settings app to PowerShell. You will learn how to access Active Directory, DNS, and Group Policy tools on your PC.
Managing servers and network services from your own computer used to require a separate machine or a remote desktop connection. Now, how to install RSAT tools on Windows 11 is something any IT professional or power user can figure out in minutes. Remote Server Administration Tools, commonly known as RSAT, give you a full suite of management utilities right on your local desktop.
Whether you are a small business owner, a system administrator, or a power user who tinkers with networks, RSAT opens up a world of possibilities. You can manage Active Directory, configure DNS servers, edit Group Policy, and much more — all without leaving Windows 11. This guide covers every installation method, troubleshooting tips, and practical use cases.
The best part? RSAT is completely free from Microsoft. You do not need expensive software or a server license to get these powerful administration tools running on your PC. Let us dive into the step-by-step process.
Key Takeaways
- RSAT lets you manage Windows servers remotely right from your Windows 11 desktop without needing a separate machine.
- You can install RSAT through the Settings app, Control Panel, or PowerShell — pick whichever method suits you best.
- RSAT is free and available directly from Microsoft as an optional feature download.
- Not all RSAT tools work on every Windows 11 edition — Pro, Enterprise, and Education editions get full support.
- You can enable or disable individual RSAT tools instead of installing the entire suite, saving disk space.
- PowerShell offers the fastest installation method for experienced users who prefer command-line workflows.
📑 Table of Contents
- What Are RSAT Tools and Why Do You Need Them?
- System Requirements for Installing RSAT on Windows 11
- Method 1: Install RSAT Through the Settings App
- Method 2: Install RSAT Using PowerShell
- Method 3: Install RSAT via Control Panel (Legacy Method)
- How to Verify RSAT Tools Are Working
- RSAT on Windows 11 Home Edition: What You Need to Know
- Comparing RSAT Installation Methods
- Common Mistakes to Avoid When Installing RSAT
- Expert Insights: Getting the Most Out of RSAT
- Final Thoughts
What Are RSAT Tools and Why Do You Need Them?
Remote Server Administration Tools are a collection of utilities designed for managing Windows servers from a client machine. Think of them as a bridge between your Windows 11 PC and your server infrastructure. Instead of logging into a server directly, you can handle most administrative tasks locally.
RSAT includes tools for Active Directory Domain Services, DNS Server, DHCP Server, Group Policy Management, and many others. Each tool comes as a separate component, so you only install what you actually need. This modular approach keeps your system lean and efficient.
Before RSAT existed, administrators had to either use a dedicated management workstation or connect through Remote Desktop. Both approaches are clunky compared to having everything at your fingertips. Windows 11 makes this process smoother than ever before.
Key RSAT Components You Can Install
- Active Directory Users and Computers — manage user accounts, groups, and organizational units.
- DNS Server Tools — configure and troubleshoot Domain Name System settings.
- DHCP Server Tools — administer Dynamic Host Configuration Protocol scopes and reservations.
- Group Policy Management — create and edit Group Policy Objects for domain-wide policies.
- Server Manager — oversee multiple servers and roles from one central console.
- Failover Cluster Manager — manage clustered servers and high-availability configurations.
System Requirements for Installing RSAT on Windows 11
Before you start installing, make sure your system meets the basic requirements. RSAT is designed to work seamlessly on Windows 11, but there are a few prerequisites you should know about.
First, you need Windows 11 Pro, Enterprise, or Education edition. The Home edition does not support RSAT installation natively through the Settings app. If you are on Windows 11 Home, do not worry — there is still a workaround using PowerShell or registry edits that we will cover later.
You will also need administrator privileges on your local machine. RSAT installation involves modifying system features, so standard user accounts cannot complete the process. Make sure your account has admin rights before proceeding.
In terms of disk space, RSAT tools are relatively lightweight. Most components together take up about 500 MB to 1 GB of storage, depending on which tools you choose. A stable internet connection is also necessary since the tools download from Microsoft servers.
Method 1: Install RSAT Through the Settings App
The Settings app method is the most straightforward approach. It uses the built-in Optional Features section in Windows 11, which lets you add and remove system components easily. This is the recommended method for most users.
Step-by-Step Instructions
- Press Windows + I to open the Settings app on your Windows 11 PC.
- Click on Apps in the left sidebar, then select Optional features.
- Scroll down and click the View features button next to the Add a feature section.
- Type RSAT in the search bar. You will see a list of available Remote Server Administration Tools.
- Select the specific RSAT tools you want to install. You can pick individual components or the entire RSAT package.
- Click Next, then click Install.
- Wait for the installation to complete. This usually takes one to five minutes depending on your internet speed.
- Once finished, click Close and restart your computer if prompted.
After restarting, you can find your RSAT tools in the Start menu. Look for them under the Windows Tools folder or search for the specific tool name. For example, type Active Directory Users and Computers in the Start search bar to launch it directly.
Pro Tips for the Settings Method
- You can install RSAT tools one at a time to save bandwidth if you only need a few components.
- The Settings app shows which tools are already installed, so you can easily identify what you still need.
- If a tool does not appear in the list, try searching for “Remote Server” instead of “RSAT” — the naming can vary slightly.
Method 2: Install RSAT Using PowerShell
PowerShell offers a fast and scriptable way to install RSAT tools. This method is ideal for IT professionals who manage multiple machines or prefer command-line workflows. It also works on Windows 11 Home edition, which is a big advantage.
Installing RSAT with a Single Command
Open PowerShell as an administrator by right-clicking the Start button and selecting Terminal (Admin). Then run the following command:
Get-WindowsCapability -Online | Where-Object Name -like "Rsat" | Add-WindowsCapability -Online
This single command detects all available RSAT tools and installs them on your system. It is the quickest way to get the full RSAT suite up and running.
Installing Specific RSAT Components
If you only need certain tools, you can target them individually. Here are a few examples:
- Active Directory tools:
Add-WindowsCapability -Online -Name Rsat.ActiveDirectory.DS-LDS.Tools~~~~0.0.1.0 - DNS Server tools:
Add-WindowsCapability -Online -Name Rsat.Dns.Tools~~~~0.0.1.0 - DHCP Server tools:
Add-WindowsCapability -Online -Name Rsat.Dhcp.Tools~~~~0.0.1.0 - Group Policy tools:
Add-WindowsCapability -Online -Name Rsat.GroupPolicy.Management.Tools~~~~0.0.1.0
Each command installs just that one component. This approach is perfect when you want to keep your installation minimal and focused.
Verifying Your RSAT Installation
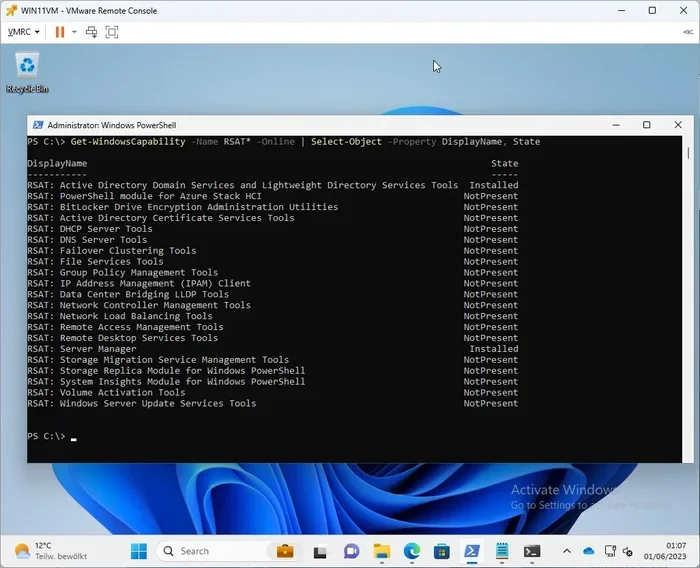
After running the PowerShell commands, you can verify the installation by checking the list of installed capabilities. Run this command:
Get-WindowsCapability -Online | Where-Object State -eq "Installed" | Where-Object Name -like "Rsat"
This displays all currently installed RSAT components on your system. If you see the tools you wanted in the list, you are all set.
Method 3: Install RSAT via Control Panel (Legacy Method)
Older versions of Windows used the Control Panel for feature management, and this method still works on Windows 11. While it is less common now, it is worth knowing for compatibility and troubleshooting purposes.
To use this method, open the Control Panel and navigate to Programs and then Programs and Features. Click on Turn Windows features on or off from the left sidebar. Scroll down the list until you find Remote Server Administration Tools. Check the box and click OK. Windows will then download and install the selected components.
This method is slightly slower than the Settings app or PowerShell approaches, but it gives you a familiar interface if you are used to older Windows versions. It also works well when the Settings app behaves unexpectedly.
How to Verify RSAT Tools Are Working
Once installation is complete, you should verify that your RSAT tools are functioning correctly. This step ensures everything is working before you need to rely on these tools for actual server management.
Launching RSAT Tools
Click the Start button and type the name of the tool you want to use. For example, type Active Directory Users and Computers or DNS Manager. If the tool opens and connects to your server or domain, the installation was successful.
You can also open Server Manager and check the Tools menu at the top. All installed RSAT tools should appear there, organized by category. This is a quick way to see which tools are available on your system.
Troubleshooting Common Issues
If a tool fails to open or shows an error message, try these steps:
- Restart your computer. A simple reboot often resolves initialization issues.
- Reinstall the specific tool. Go back to Optional Features and toggle the tool off and on again.
- Check for Windows updates. Some RSAT components require the latest OS patches to function properly.
- Run PowerShell as administrator. If you used the PowerShell method, make sure you elevated the terminal before running commands.
RSAT on Windows 11 Home Edition: What You Need to Know
Windows 11 Home does not support RSAT installation through the Settings app. However, you can still install RSAT tools using the PowerShell method described above. The Add-WindowsCapability command works on all Windows 11 editions, including Home.
This is great news for home lab enthusiasts, students learning IT skills, and small business owners who do not have access to Pro or Enterprise editions. You get the same powerful administration tools regardless of your Windows edition.
One limitation to keep in mind: some advanced RSAT features may require a domain environment to function fully. If you are working in a workgroup or standalone setup, certain tools will still install but may have limited functionality without a domain controller to connect to.
Comparing RSAT Installation Methods
Choosing the right installation method depends on your needs and technical comfort level. Here is a quick comparison of the three methods we covered:
| Feature | Settings App | PowerShell | Control Panel |
|---|---|---|---|
| Ease of Use | Very Easy | Moderate | Easy |
| Works on Windows 11 Home | No | Yes | Yes |
| Scriptable | No | Yes | No |
| Selective Installation | Yes | Yes | Yes |
| Speed | Fast | Very Fast | Moderate |
| Best For | Most Users | IT Professionals | Legacy Users |
For most people, the Settings app method is the way to go. It is visual, straightforward, and requires no command-line knowledge. PowerShell is the best choice for automation and for users on Windows 11 Home.
Common Mistakes to Avoid When Installing RSAT
Even a straightforward process like installing RSAT can have pitfalls. Here are some common mistakes to watch out for:
- Skipping the restart. Some RSAT components do not fully register until you reboot. Always restart after installation.
- Installing on Windows 11 Home through Settings. This will not work and can cause confusion. Use PowerShell instead.
- Ignoring Windows updates. Outdated OS builds can cause compatibility issues with newer RSAT components.
- Installing everything at once. If you only need a few tools, installing the full suite wastes disk space and can clutter your Start menu.
- Not running as administrator. Both the Settings app and PowerShell need elevated privileges for feature installation to succeed.
Avoiding these mistakes saves time and prevents frustrating troubleshooting sessions down the road.
Expert Insights: Getting the Most Out of RSAT
Once your RSAT tools are installed, there are several ways to streamline your workflow. Pin your most-used tools to the taskbar or Start menu for quick access. Create desktop shortcuts for tools you use daily so you can launch them with a single click.
Consider using Windows Admin Center alongside RSAT for a web-based management experience. Windows Admin Center provides a graphical dashboard that complements the traditional MMC-based RSAT tools. Together, they give you a comprehensive management solution.
Another pro tip is to keep your RSAT tools updated alongside Windows updates. Microsoft regularly improves RSAT compatibility and adds new features with each major Windows release. Staying current ensures you have access to the latest management capabilities.
If you manage multiple servers, you can save connection profiles within RSAT tools. For instance, DNS Manager lets you save connections to multiple DNS servers, making it easy to switch between them without re-entering server names each time.
Final Thoughts
Learning how to install RSAT tools on Windows 11 is a valuable skill for anyone involved in IT administration. Whether you choose the Settings app, PowerShell, or Control Panel method, the process is straightforward and free. The modular nature of RSAT means you install exactly what you need, keeping your system clean and efficient.
With RSAT installed, you can manage Active Directory, DNS, DHCP, Group Policy, and many other server roles directly from your Windows 11 desktop. This capability saves time, reduces the need for multiple machines, and makes server management more accessible than ever.
Start with the tools you need most, explore the features at your own pace, and remember that Microsoft provides extensive documentation for each RSAT component. You will be managing servers like a pro in no time.
Frequently Asked Questions
Can I install RSAT tools on Windows 11 Home edition?
Yes, you can. The Settings app method does not work on Windows 11 Home, but you can use the PowerShell command Add-WindowsCapability to install RSAT tools on any Windows 11 edition, including Home.
Are RSAT tools free to download and use?
Absolutely. RSAT tools are completely free from Microsoft. There is no license fee, and they are available as optional features built into Windows 11.
How long does it take to install RSAT tools on Windows 11?
Installation typically takes one to five minutes. The exact time depends on your internet speed and how many components you are installing. PowerShell tends to be the fastest method.
Do I need an internet connection to install RSAT tools?
Yes, you need an active internet connection. Windows downloads the RSAT components from Microsoft servers during the installation process. Without internet, the installation will fail.
Can I uninstall RSAT tools after installing them?
Yes, you can remove RSAT tools anytime. Go to Settings > Apps > Optional features, find the RSAT tool you want to remove, and click Uninstall. This works the same way as installing them.
Which RSAT tools are the most commonly used?
The most popular RSAT tools are Active Directory Users and Computers, DNS Manager, Group Policy Management, and Server Manager. These four cover the majority of day-to-day server administration tasks for most IT professionals.