How to Remove Rust from Tools with Simple Home Remedies
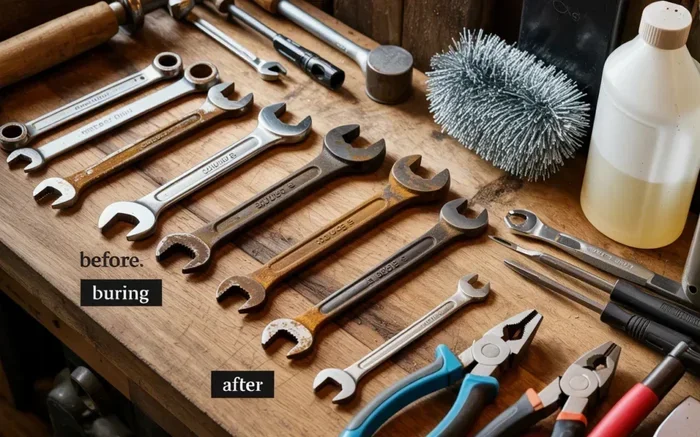
Rusty tools don’t have to be thrown away. You can remove rust from tools using common household items like vinegar, baking soda, and lemon juice. These simple home remedies are safe, affordable, and work surprisingly well on both surface rust and deeper corrosion.
There’s nothing worse than reaching for your favorite wrench or saw only to find it covered in orange rust. Whether your how to remove rust from tools journey starts with a single hand tool or an entire garage full of neglected equipment, the good news is you don’t need expensive chemicals or professional help. Simple items from your kitchen pantry can bring rusted tools back to life.
Rust forms when iron or steel tools are exposed to moisture and oxygen over time. It eats away at the metal surface and can eventually ruin a tool beyond repair. But catching rust early and treating it with home remedies for rust removal can save you hundreds of dollars. In this guide, we’ll walk you through every method, step by step, so you can tackle rusted tool restoration with confidence.
We’ll cover everything from quick fixes using vinegar and baking soda to longer soaks for heavily corroded items. You’ll also learn how to prevent rust from coming back and when it’s better to replace a tool than try to save it. Let’s get started.
Key Takeaways
- White vinegar and baking soda are the most effective and accessible rust removers you already have at home.
- Lemon juice and salt create a natural acid combo that dissolves rust without harsh chemicals.
- Steel wool and wire brushes work great for physical rust removal after soaking.
- Prevention is key – proper storage and oiling keep tools rust-free for years.
- WD-40 and rust converters offer long-term protection for restored tools.
- Patience matters – letting remedies sit longer produces better results on tough rust.
- Regular tool maintenance saves money and extends the life of your entire collection.
📑 Table of Contents
Why Tools Get Rusty: Understanding the Problem
Before you dive into rust removal techniques, it helps to understand what causes rust in the first place. Rust is technically called iron oxide. It forms when bare metal comes into contact with water and oxygen. The more moisture your tools are exposed to, the faster rust develops.
Tools left in damp garages, sheds, or outdoor workshops are especially vulnerable. Even humidity alone can trigger corrosion over time. Hand tools like wrenches, pliers, and screwdrivers are common victims because they often sit unused for long periods.
The Science Behind Rust Formation
Rust is a chemical reaction. Iron reacts with oxygen in the presence of water. This creates a new compound called iron oxide, which is brittle and flaky. Unlike the original metal, rust doesn’t protect the tool. It actually spreads and weakens the structure over time.
Surface rust is the first stage. It looks like orange or brown spots on the metal. At this point, removal is easy. Deep rust happens when the corrosion eats through the metal surface. This stage requires more aggressive treatment. But even deeply rusted tools can often be saved with the right approach.
Common Mistakes That Cause Rust
Many people accidentally speed up rust formation without realizing it. Storing tools on concrete floors traps moisture against the metal. Leaving dirty tools with grease or soil on them creates a perfect environment for corrosion. And tossing wet tools into a closed toolbox is one of the fastest ways to ruin them.
Another mistake is ignoring early signs of rust. What starts as a small spot can spread quickly. The sooner you address corrosion removal, the easier the job will be. Regular tool maintenance habits go a long way toward keeping your collection in great shape.
Best Home Remedies for Rust Removal
Now let’s get to the good stuff. These home remedies for rust use items you probably already have. Each method works differently, so choosing the right one depends on how bad the rust is and what type of tool you’re treating.
Vinegar Soak Method
White distilled vinegar is one of the most popular and effective rust dissolvers available. The acetic acid in vinegar breaks down iron oxide naturally. It works well on both surface rust and moderate corrosion.
To use this method, simply submerge the rusted tool in a container filled with undiluted white vinegar. Make sure the entire rusted area is covered. Let it soak for at least 12 hours, or overnight for heavier rust. After soaking, use steel wool or a wire brush to scrub away the loosened rust. Rinse the tool thoroughly with clean water and dry it completely right away.
Quick Tip: For smaller tools like nails, screws, or bolts, a jar of vinegar works perfectly as a soaking container. Just drop them in and wait.
Baking Soda Paste Method
Baking soda is a gentle but effective rust removal solution for lighter corrosion. It works best on surface rust and tools that can’t be fully submerged. The paste creates a mild abrasive that lifts rust without scratching the underlying metal too aggressively.
Mix baking soda with a small amount of water to form a thick paste. Spread it generously over the rusted areas. Let it sit for at least one hour. Then scrub with steel wool or an old toothbrush. For stubborn spots, you can leave the paste on overnight and scrub again the next morning.
This method is great for tools with mixed surfaces, like tools with wooden handles. You can carefully apply the paste only to the metal parts without damaging the handle. Rust converter products work similarly but use a chemical reaction to turn rust into a stable surface. Home remedies are gentler and much cheaper.
Lemon Juice and Salt Method
Lemon juice is a natural acid that dissolves rust effectively. When combined with salt, it creates a powerful corrosion removal treatment that works fast. This method is perfect for tools with light to moderate rust.
Squeeze fresh lemon juice over the rusted area and sprinkle salt generously on top. Let the mixture sit for two to three hours. The acid and salt work together to break down the rust. Then use the lemon rind or steel wool to scrub the area clean. Rinse with water and dry thoroughly.
Expert Insight: The citric acid in lemons is strong enough to handle most household rust problems. This method leaves a pleasant scent and is completely non-toxic, making it safe for use around children and pets.
Potato and Dish Soap Method
This one sounds strange, but it really works. Potatoes contain oxalic acid, which is a natural rust fighter. This rust removal trick is perfect for tools with small rust spots.
Cut a potato in half and dip the cut side in dish soap or baking soda. Rub it directly on the rusted area using a back-and-forth motion. The oxalic acid does the heavy lifting while the soap helps the potato glide smoothly. Replace the potato slice as needed and continue until the rust is gone.
This method is surprisingly gentle and works well on delicate tools where you don’t want to use harsh abrasives. It’s also a fun trick to teach kids about natural cleaning solutions.
Step-by-Step Rust Removal Process
Now that you know the best remedies, let’s walk through the complete process of restoring your tools. Following these steps ensures the best results and helps protect the metal for the long term.
Step One: Assess the Damage
Before you start, take a close look at each tool. Is the rust only on the surface, or has it eaten into the metal deeply? Surface rust is easy to treat with any of the home remedies we discussed. Deep rust may require repeated treatments or a combination of methods.
Wear gloves when handling rusted tools. Rust particles can irritate your skin, and old tools may have sharp edges. A quick inspection also helps you decide whether a tool is worth saving or if it’s beyond repair.
Step Two: Choose Your Remedy
Match your remedy to the rust severity. For light rust, try the baking soda paste or lemon and salt method. For moderate to heavy rust, the vinegar soak is your best bet. You can also combine methods. For example, soak a tool in vinegar first, then scrub with baking soda paste for extra cleaning power.
If you’re working with a large tool that can’t be submerged, focus on the paste methods or apply vinegar directly with a cloth. WD-40 can also help loosen rust when applied generously and left to sit for several hours.
Step Three: Scrub and Clean
After soaking or applying your chosen remedy, it’s time to scrub. Steel wool is the most effective tool for this job. Fine-grit steel wool works well for lighter rust, while coarse steel wool handles heavier buildup. An old toothbrush is great for getting into tight spaces and grooves.
For stubborn rust spots, try using a wire brush attachment on a drill. This speeds up the process significantly, especially on larger tools. Just be careful not to remove too much healthy metal in the process.
Once the rust is gone, rinse the tool with warm water. Make sure to remove all residue from the cleaning agent. Then dry the tool immediately and completely. Any remaining moisture will just start the rust cycle all over again.
Step Four: Protect and Store
After cleaning, apply a thin coat of oil to protect the bare metal. Mineral oil, camellia oil, or even a light spray of WD-40 works well. This creates a barrier against moisture and oxygen.
Store your tools in a dry place. Hanging them on a pegboard keeps them off damp floors. If you store tools in a toolbox, consider adding silica gel packets to absorb excess moisture. For larger workshop setups, keeping tools clean and organized makes a huge difference in preventing future rust.
Proper storage also means your tools are ready to grab and use whenever you need them. If you use pneumatic tools or air-powered equipment in your workshop, keeping your air compressor well-maintained helps ensure everything runs smoothly. You can learn more about using your compressor effectively in our guide on Easy Air Compressor How To Use.
Preventing Rust on Your Tools
Cleaning rust off your tools is only half the battle. The real win comes from preventing rust from forming again. Prevention is simple, free, and saves you from repeating the entire removal process.
Keep Tools Clean and Dry
After every use, wipe your tools down with a clean, dry cloth. Remove any moisture, dirt, or debris. This simple habit dramatically reduces the risk of rust forming. Pay special attention to joints, hinges, and moving parts where moisture tends to hide.
If you’ve been working in wet or humid conditions, dry your tools as soon as possible. Never leave wet tools sitting in a pile or tossed into a closed container. A few extra minutes of drying after each use adds years to your tools’ lifespan.
Apply Protective Coatings
A light coat of oil is your best friend when it comes to rust prevention. Before storing tools for the season, give them a thin wipe of mineral oil or a dedicated tool protectant. Paste wax is another excellent option that creates a durable moisture barrier.
For tools you use frequently, a quick spray of WD-40 after each use keeps them protected without much effort. The key is consistency. Making protection part of your routine means you’ll rarely have to deal with heavy rust again.
Control Your Workshop Environment
Your workshop environment plays a big role in rust prevention. High humidity accelerates corrosion. If your workshop is damp, consider using a dehumidifier or adding ventilation. Keeping the air moving reduces moisture buildup on metal surfaces.
Store tools off concrete floors whenever possible. Concrete absorbs moisture and transfers it to anything sitting on it. Use shelving, pegboards, or tool chests with rubber mats. These small changes make a significant difference in keeping your tools rust-free.
For those who run workshops with power equipment, maintaining your entire setup matters. If you use generators for backup power, understanding battery care helps prevent unexpected failures. Check out our article on How Long Does A Generator Battery Last for tips on keeping your power equipment in top shape.
When to Replace Instead of Repair
Not every rusted tool can be saved, and that’s okay. Knowing when to replace a tool is just as important as knowing how to restore one. Using a severely damaged tool can be unsafe and frustrating.
Signs a Tool Is Beyond Saving
Check for deep pitting and holes in the metal. If rust has eaten through the tool and created gaps or weak spots, it’s time to replace it. Tools with structural damage can break during use, which poses a real safety risk.
Also consider the cost of restoration. If a tool requires hours of treatment and the replacement cost is minimal, replacement often makes more sense. Basic hand tools like wrenches and pliers are affordable and widely available.
Finally, think about the tool’s overall condition. If a tool has cracked handles, damaged insulation, or other issues beyond rust, replacing it is the safer choice. Your safety always comes first.
When Restoration Is Worth It
On the other hand, quality tools with solid construction are often worth the effort to restore. Vintage hand tools, quality brand-name equipment, and specialty tools can be expensive to replace. In these cases, tool restoration with home remedies is almost always the better option.
Invest your time in tools that have years of good use left in them. A little vinegar soak and some elbow grease can bring a quality tool back to near-new condition. The satisfaction of restoring a favorite tool is well worth the effort.
For those who work with heavier equipment and need reliable power on job sites, having a solid backup plan matters. Understanding what size generator you need for your workshop can prevent downtime during projects. Learn more in our guide on How Big Of A Backup Generator Do I Need.
Final Thoughts on Rust-Free Tools
Removing rust from tools doesn’t have to be complicated or expensive. With simple home remedies like vinegar, baking soda, lemon juice, and salt, you can bring most rusted tools back to working condition. The key is acting quickly when you spot rust and staying consistent with prevention habits.
How to remove rust from tools is a skill that saves money, reduces waste, and keeps your favorite tools in service for years. Whether you’re dealing with a single rusty wrench or an entire collection of neglected hand tools, the methods in this guide give you everything you need to succeed.
Start with the simplest remedy that matches your rust level, follow the steps carefully, and finish with proper protection and storage. Your tools will thank you. And the next time you reach for a clean, rust-free tool, you’ll feel that satisfaction of a job well done.
Remember that prevention is the best cure. A few minutes of care after each use and proper storage habits keep rust from ever becoming a problem again. Stay proactive, keep your workshop dry, and your tools will stay in excellent condition for a lifetime.
Frequently Asked Questions
Can I use Coca-Cola to remove rust from tools?
Yes, Coca-Cola works as a rust remover because it contains phosphoric acid. Submerge the rusted tool in a bowl of cola for 24 hours, then scrub with steel wool. It’s not as strong as vinegar, but it works well for light surface rust and is a fun alternative to try.
How long should I soak tools in vinegar for rust removal?
For light surface rust, 4 to 8 hours is usually enough. For heavier rust, soak overnight or up to 24 hours. Check the tool periodically and remove it once the rust loosens easily. Don’t leave tools in vinegar for days, as the acid can start to affect the base metal.
Is it safe to use rusted tools after cleaning them?
Yes, as long as the rust hasn’t compromised the structural integrity of the tool. After cleaning, inspect the tool for pitting, thin spots, or cracks. If the metal is still solid and the tool functions properly, it’s safe to use. Always wear gloves during the cleaning process.
What’s the best oil to prevent rust on tools after cleaning?
Mineral oil is the most popular choice for tool protection. It’s odorless, non-toxic, and creates an excellent moisture barrier. Camellia oil is another traditional option favored by many tool enthusiasts. WD-40 also works well for quick protection between uses.
Can rust removal damage the tool if done incorrectly?
Overly aggressive scrubbing with coarse steel wool can scratch and remove too much metal. Always start with the gentlest method first and work your way up only if needed. Vinegar soaks are gentle and won’t damage healthy metal when used for appropriate time periods.
Do I need special equipment to remove rust from tools?
No special equipment is needed for most home rust removal. White vinegar, baking soda, lemon juice, steel wool, and a container are all you need. For larger jobs, an air compressor can help blow off rust debris after cleaning. You can learn more about getting the most from your compressor in our guide on How To Get More Cfm From Air Compressor.