Vauxhall Combo Conversion Kit Everything You Need to Know
A Vauxhall Combo conversion kit provides all the essential components to transform your van into a comfortable campervan or work vehicle. This guide covers everything from insulation and wiring to fitting a bed platform and kitchen unit. Whether you own a Combo 1, Combo 2, or Combo 3, you’ll find practical tips to plan and execute your van conversion with confidence.
If you own a Vauxhall Combo and dream of turning it into a cozy campervan or a mobile workshop, a Vauxhall Combo conversion kit is the smartest place to start. These kits bundle the essential parts you need, from insulation panels and wiring to water tanks and gas fittings. Instead of hunting for individual components, you get a curated set that fits the unique shape of your van. A van conversion can feel overwhelming, but the right kit breaks the project into manageable steps. Whether you are a weekend DIYer or a seasoned builder, understanding what goes into a conversion kit helps you plan, budget, and enjoy the build.
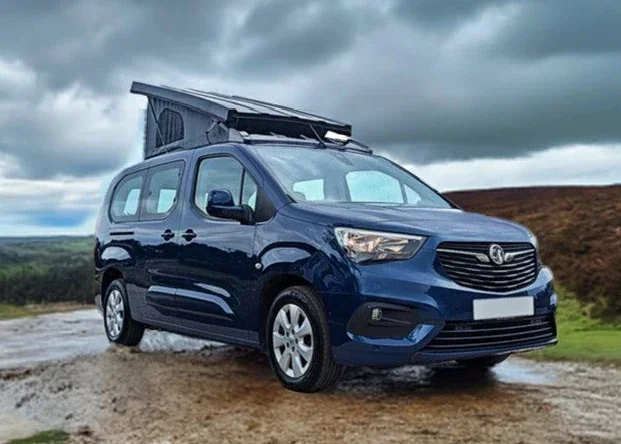
The Vauxhall Combo has been a favorite for conversions since the 1990s. Its compact size makes it easy to park and maneuver, while the interior space is enough to create a functional living area. The Combo 1, Combo 2, and Combo 3 each offer different layouts, so your kit choice must match your specific model. A well-planned campervan conversion turns a simple panel van into a home on wheels. You can add a bed platform, a small kitchen unit, storage cabinets, and a comfortable seating area. The key is to start with a solid kit that covers the basics and then customize from there.
In this guide, we walk you through everything you need to know about the Vauxhall Combo conversion kit. We cover the different Combo models, the essential components of a kit, a step-by-step installation process, and the common pitfalls to avoid. By the end, you will feel confident to begin your DIY van conversion with a clear plan in hand. Let us dive in.
Key Takeaways
- A proper conversion kit saves time: It bundles insulation, wiring, plumbing, and fittings so you avoid buying parts separately.
- Know your Combo model: The Combo 1, Combo 2, and Combo 3 each have different interior dimensions and conversion potential.
- Insulation is the foundation: A quality vapor barrier and rigid insulation keep your van warm in winter and cool in summer.
- Electrical planning comes first: Map your 12V system, leisure battery, inverter, and solar panel needs before installing anything.
- Avoid the common mistakes: Skipping a floor plan, using the wrong sealant, or ignoring ventilation leads to costly fixes.
- Small details matter: Roof vents, LED lighting, and a well-designed bed platform make a huge difference in daily comfort.
📑 Table of Contents
- What Is a Vauxhall Combo Conversion Kit?
- Choosing the Right Combo Model for Your Conversion
- Essential Components of a Vauxhall Combo Conversion Kit
- Step-by-Step Guide to Installing Your Conversion Kit
- Common Mistakes to Avoid During a Vauxhall Combo Conversion
- Expert Tips for a Smooth Conversion
- Conclusion
What Is a Vauxhall Combo Conversion Kit?
A Vauxhall Combo conversion kit is a pre-selected collection of materials and components designed to convert a standard Vauxhall Combo van into a livable space. Unlike buying parts piecemeal, a kit ensures compatibility and saves you hours of research. Most kits focus on the structural and comfort elements, leaving the cosmetic finishing touches to you. Think of it as a blueprint in a box. You still need to do the work, but the heavy lifting is already planned.
These kits typically include insulation boards, vapor barriers, wiring looms, LED lights, water tanks, plumbing fittings, gas pipe connectors, and mounting brackets. Some premium kits even come with a pre-cut bed platform template or a kitchen unit design guide. The goal is to give you a head start on the most technical parts of the van conversion. You can then focus on the creative touches like upholstery, decor, and personal storage solutions.
What’s Included in a Typical Conversion Kit?
A standard Vauxhall Combo conversion kit will contain several core categories. Insulation materials such as rigid foam boards or reflective foil help regulate temperature. A vapor barrier prevents condensation from forming inside the walls and ceiling. Electrical kits often include a leisure battery, a 12V distribution board, and enough wiring to run lights, a fridge, and a phone charger. Water systems usually feature a fresh water tank, a pump, and basic pipe fittings. Some kits also provide gas line components for a small hob or heater. Always check the kit description to see if it matches your Combo model year.
Choosing the Right Combo Model for Your Conversion
Not all Vauxhall Combos are the same, and picking the right model for your conversion kit is crucial. The interior dimensions, wheel arch placement, and cargo area shape vary across generations. A kit designed for a Combo 2 will not fit a Combo 3 without modification. Before purchasing any kit, confirm your van’s model code and year. This simple step saves time, money, and frustration.
Combo 1 (1994–2001)
The original Combo 1 is a compact panel van with a relatively small cargo area. It is perfect for a minimal campervan conversion where space is used wisely. Because the interior is narrow, you will benefit from a kit that offers slim insulation panels and a low-profile bed platform. Many Combo 1 owners opt for a rear bed that folds down from the side wall, maximizing standing height during the day. The electrical system in these older models often relies on a basic 12V setup, so a simple wiring kit is usually sufficient.
Combo B / Combo 2 (2001–2013)
The Combo 2 brought more interior space and a slightly wider body. This model is extremely popular for DIY van conversion projects because it offers a good balance of size and drivability. A Vauxhall Combo conversion kit for the Combo 2 often includes larger water tanks and more flexible layout options. You can fit a full kitchen unit, a separate sleeping area, and still have room to move around. The Combo 2 also has a more modern electrical architecture, making it easier to integrate a leisure battery and an inverter.
Combo C / Combo 3 (2013–Present)
The latest generation Combo 3 is larger and more versatile. It comes in both the Combo Life (passenger variant) and Combo Cargo (van variant). The interior is roomier, which opens up possibilities for a full motorhome conversion. Kits for the Combo 3 often include components for a spacious island bed, a dinette that converts to a sleeping area, and a comprehensive plumbing system. The Combo 3’s modern wiring loom makes it easier to add solar panels and a multi-stage charging system. If you want a conversion van with home comforts, the Combo 3 is the strongest candidate.
| Model | Years | Interior Length | Conversion Potential |
|---|---|---|---|
| Combo 1 | 1994–2001 | ~1.7 m | Basic sleeper van, minimal kit |
| Combo B / Combo 2 | 2001–2013 | ~2.0 m | Full campervan with kitchen and wet room |
| Combo C / Combo 3 | 2013–Present | ~2.3 m | Luxury conversion with island bed and solar |
Essential Components of a Vauxhall Combo Conversion Kit
A well-designed Vauxhall Combo conversion kit covers the core systems that make a van habitable. Each component plays a specific role in comfort, safety, and convenience. Understanding what these parts do helps you choose the right kit and avoid gaps in your build.
Insulation and Vapor Barrier
Insulation is the single most important part of any van conversion. It regulates temperature, reduces condensation, and improves soundproofing. Most kits use rigid foam boards like PIR or polyurethane, which offer excellent thermal resistance in a thin profile. The vapor barrier goes on the warm side of the insulation to stop moisture from entering the insulation and forming mold. For a Combo, you will insulate the floor, walls, and ceiling. A good kit will provide pre-cut pieces that match the curvature of the Combo’s interior, saving you hours of cutting and fitting.
Electrical and Wiring System
The electrical system powers your lights, fridge, water pump, and charging ports. A typical conversion kit includes a leisure battery, usually a 100Ah AGM or lithium unit. You will also get a 12V distribution board with fuses for each circuit. The wiring loom is sized to handle the expected load, and it runs under the floor or along the wall panels. Many owners add a solar panel and an inverter to the kit later, but the base wiring should be ready for those upgrades. LED lighting is standard in modern kits because it draws very little power and stays cool.
Water and Plumbing System
If you plan to have a sink and a fresh water supply, your kit should include a water tank, a 12V pump, and the necessary pipes and fittings. Tanks are usually made from polyethylene and come in sizes from 10 to 20 liters for a Combo. The pump pushes water from the tank to the sink when you turn on the tap. Waste water is collected in a separate grey water tank, which you can empty at a service point. The plumbing in a Vauxhall Combo conversion kit is designed to be simple and leak-free, with quick-connect fittings that make maintenance easy.
Gas and Heating
For heating and cooking, many conversions use a small gas system. A kit may include a gas bottle bracket, a pressure regulator, and flexible gas lines. The gas powers a hob for cooking and sometimes a heater like the Webasto or Propex. Safety is paramount: always use a carbon monoxide detector and ensure the gas system is ventilated properly. The gas components in a conversion kit are rated for caravan use and meet European safety standards.
Step-by-Step Guide to Installing Your Conversion Kit
Installing a Vauxhall Combo conversion kit is a rewarding project, but it requires patience and careful planning. You do not need to be a professional builder, but you should be comfortable with basic tools and following instructions. Here is a practical roadmap to guide you through the process.
Step 1: Planning and Layout Design
Before you remove any panels, sketch your ideal layout on paper or use a free van design app. Measure the interior of your Combo carefully, noting the positions of wheel arches, the spare wheel well, and the battery location. Decide where the bed, kitchen, and storage will go. A Vauxhall Combo conversion kit often comes with layout suggestions, but you should adapt them to your needs. Consider how you will use the van day to day. If you need to drive with the bed set up, a fixed platform is essential. If you only use it for weekend trips, a fold-down bed might be more versatile.
Step 2: Preparing the Van Shell
Start by removing the existing interior trim, seats, and flooring. Clean the metal surfaces thoroughly and check for rust. Any rust spots should be treated with a primer and sealed. Next, install the floor insulation and vapor barrier. The vapor barrier goes directly on the metal floor, followed by the insulation boards and then the new flooring material. Many builders use marine-grade plywood or composite boards for the floor because they are durable and moisture-resistant. This step is the foundation of your entire build, so take your time to get it right.
Step 3: Fitting Insulation and Flooring
With the floor prepared, move to the walls and ceiling. The conversion kit insulation panels are usually pre-cut, but you may need to trim them around windows and wheel arches. Use a utility knife and a straight edge for clean cuts. Glue the insulation panels with contact adhesive designed for foam, and then apply the vapor barrier over the top. Seal all seams with vapor barrier tape to create a continuous moisture barrier. After the insulation is in place, you can begin fitting the interior wall panels, which will hide the insulation and provide a surface for mounting cabinets and lights.
Step 4: Installing Electrical and Lighting
Now it is time to wire up the electrical system. Start by mounting the leisure battery in a secure, ventilated location. Connect the battery to the distribution board using appropriately sized cables. Run the wiring along the wall cavities, securing it with cable clips. Install LED lights in the ceiling, under cabinets, and in any storage areas. Add a USB charging port for phones and tablets. If your kit includes a 12V fridge, wire it to a dedicated circuit with its own fuse. Test every connection before you close up the panels. A simple 12V system test with a multimeter will confirm everything is working correctly.
Step 5: Adding Water and Gas Systems
With the electrical in place, focus on the water system. Mount the fresh water tank under the bed or in a dedicated compartment. Connect the pump and run the pipes to the sink. Use quick-connect fittings so you can easily disconnect the system for winterizing or maintenance. For the gas system, secure the gas bottle in a ventilated external locker. Run the gas line to the hob and heater, and connect the regulator. Always test for leaks using a soapy water solution before you use the system. A properly installed gas system is safe and reliable, but it demands attention to detail.
Common Mistakes to Avoid During a Vauxhall Combo Conversion
Even with the best Vauxhall Combo conversion kit, mistakes can happen. Knowing the common pitfalls helps you avoid them and keeps your project on track.
- Skipping the floor plan: Rushing into cutting and fitting without a clear layout leads to wasted space and awkward furniture placement.
- Using the wrong adhesive: Some glues damage foam insulation or do not bond well to metal. Always use adhesives recommended for van conversions.
- Ignoring ventilation: Without proper roof vents and air circulation, condensation builds up and causes mold. A roof vent is a small investment with huge benefits.
- Undersizing the electrical system: If you plan to run a fridge, heater, and lights, make sure your battery and wiring can handle the load. An undersized system leads to power shortages.
- Forgetting the vapor barrier: Skipping the vapor barrier or installing it incorrectly is the number one cause of damp and insulation failure.
- Overcomplicating the design: A simple, functional layout often works better than a complex one. Focus on what you truly need and build around that.
Expert Tips for a Smooth Conversion
Experienced DIY van conversion builders share a few insights that make the process smoother and more enjoyable.
Quick Tip: Before you buy your Vauxhall Combo conversion kit, measure the cargo area with a tape measure and compare it against the kit’s compatibility list. Even a few centimeters can make a difference in fit.
Quick Tip: Use a laser level to ensure your bed platform and cabinets are perfectly aligned. A small investment in a level saves hours of adjusting later.
Quick Tip: Label every wire and connector during the electrical install. When you need to troubleshoot a light or a socket months later, you will thank yourself for the clear labeling.
Quick Tip: Consider adding a solar panel to your kit from the start. Even a small 100W panel can significantly extend your off-grid power and reduce reliance on shore power.
Quick Tip: Keep a spare parts box with extra fuses, cable ties, sealant, and pipe connectors. You will need them during the build and for future maintenance.
Conclusion
A Vauxhall Combo conversion kit is the perfect starting point for anyone looking to transform their van into a comfortable campervan or a functional work vehicle. It provides all the core components you need, from insulation and wiring to water and gas systems, so you can focus on the creative and personal aspects of your build. By choosing the right Combo model, understanding the essential kit components, and following a careful installation process, you set yourself up for a successful van conversion. Avoid the common mistakes, use the expert tips, and take your time with each step. The result will be a unique, personalized space that you can enjoy for years to come. Start planning your Vauxhall Combo conversion kit project today and turn your van into a home on wheels.
Frequently Asked Questions
What does a Vauxhall Combo conversion kit include?
A typical Vauxhall Combo conversion kit includes insulation panels, a vapor barrier, wiring loom, LED lights, a leisure battery, water tank, pump, plumbing fittings, gas line components, and mounting brackets. The exact contents vary by kit, so always check the product description to ensure it matches your model and conversion goals.
Can I install a Vauxhall Combo conversion kit myself?
Yes, most kits are designed for DIY installation. They come with instructions and pre-cut components that simplify the process. Basic tools like a drill, screwdriver, utility knife, and multimeter are all you need. If you have never done a van conversion before, start with a simpler kit and take your time to learn as you go.
Which Vauxhall Combo model is best for a conversion?
The Combo 2 and Combo 3 are the most popular choices for conversions because they offer the best balance of space and drivability. The Combo 1 works well for a minimal sleeper van. Choose a model based on your budget, the level of comfort you want, and how you plan to use the van.
How long does it take to install a conversion kit?
A typical Vauxhall Combo conversion kit takes between two and four weekends to complete, depending on your experience and the complexity of the layout. First-time builders should allow extra time for learning and troubleshooting. Planning and preparation can significantly reduce the overall build time.
Do I need special tools for the conversion?
You will need basic tools such as a drill, screwdriver set, utility knife, measuring tape, and a multimeter. For cutting insulation and plywood, a circular saw or jigsaw is helpful. Most kits do not require specialized equipment, making the project accessible to a wide range of DIYers.
Is it cheaper to buy a conversion kit or individual parts?
Buying a conversion kit is often more cost-effective because it bundles components at a discounted price and saves you the time of sourcing each part individually. However, if you already have some van conversion experience and want to customize every detail, purchasing parts separately gives you more flexibility.