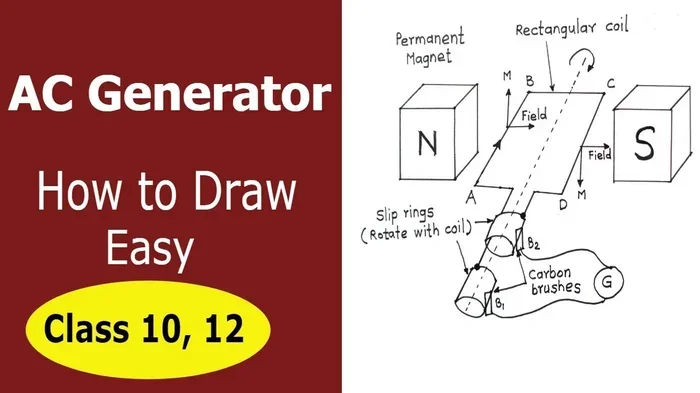
How to Draw a Generator Step by Step Guide for Beginners
Drawing a generator doesn’t have to be hard. This step-by-step guide walks beginners through sketching generator diagrams, labeling key components, and creating clean technical illustrations. You’ll learn essential drawing techniques, common mistakes to avoid, and pro tips to make your generator drawings look professional.
Have you ever wanted to learn how to draw a generator but didn’t know where to start? Maybe you’re an engineering student, a DIY enthusiast, or someone who just loves sketching mechanical equipment. Whatever your reason is, this guide will walk you through the entire process from scratch.
Drawing a generator might sound intimidating at first. There are coils, magnets, rotors, and stators to think about. But here’s the good news. You don’t need to be an artist to create a solid generator diagram. You just need a few basic skills and a willingness to practice.
In this guide, we’ll break everything down into simple, easy-to-follow steps. By the end, you’ll know how to sketch a generator from multiple angles, label its parts, and add the details that make your drawing stand out. Let’s get started.
Key Takeaways
- Start with basic shapes: Every great generator drawing begins with simple outlines and geometric forms.
- Label everything: Adding component labels makes your diagram clear and useful for others.
- Use reference images: Studying real generators helps you capture accurate proportions and details.
- Master the stator and rotor: These are the two most important parts to get right in any generator drawing.
- Practice shading and depth: Adding shadows and lines gives your drawing a realistic, three-dimensional feel.
- Keep it simple first: Don’t chase perfection on your first attempt. Build complexity gradually.
- Digital tools help: Software like AutoCAD or free alternatives can elevate your hand-drawn sketches into polished diagrams.
📑 Table of Contents
- Understanding What You’re Drawing
- Gathering Your Drawing Tools
- Step-by-Step Guide to Drawing a Generator
- Common Mistakes Beginners Make When Drawing Generators
- Taking Your Generator Drawings to the Next Level
- How Generator Drawings Connect to Real-World Applications
- Tips for Practicing and Improving
- Conclusion
Understanding What You’re Drawing
Before you put pencil to paper, it helps to understand what a generator actually is and how it works. A generator converts mechanical energy into electrical energy. This is the core principle behind how to draw a generator accurately.
When you draw a generator, you’re essentially illustrating a machine that spins a magnet inside a coil of wire. That spinning motion creates an electrical current. Simple concept, right? But when it comes to sketching the actual device, there are several key components you need to represent.
The Main Components of a Generator
Every generator has a few essential parts. Knowing what they look like and where they sit will make your drawing much easier.
- Stator: The stationary part that holds the wire coils in place.
- Rotor: The spinning part that contains the magnets or electromagnets.
- Commutator: A rotary switch that keeps current flowing in one direction.
- Brushes: Carbon blocks that maintain contact with the commutator.
- Shaft: The rotating rod that connects the rotor to the engine or turbine.
- Frame: The outer casing that holds everything together.
Spend a few minutes looking at reference photos of generators. Notice how the stator wraps around the rotor. See how the shaft extends out from one end. These observations will directly improve your drawing.
Gathering Your Drawing Tools
You don’t need fancy equipment to draw a great generator. But having the right tools makes a big difference in the quality of your work.
Basic Tools for Beginners
Start with the basics. A standard pencil set gives you the range you need.
- Pencils: HB for sketching, 2B for darker lines, and 4H for light construction lines.
- Eraser: A kneaded eraser works best for lifting graphite without smudging.
- Ruler: A straight edge helps you draw clean lines and symmetrical shapes.
- Compass: Useful for drawing perfect circles for coils and gears.
- Paper: Smooth, white drawing paper gives you the best surface for pencil work.
If you prefer digital drawing, programs like AutoCAD, SketchUp, or even free tools like Inkscape work wonderfully for creating generator technical drawings. Digital tools let you undo mistakes easily and create precise measurements.
Setting Up Your Workspace
Find a well-lit area with a flat, stable surface. Good lighting prevents eye strain and helps you see the details in your drawing. Keep your reference images nearby so you can check proportions as you go.
Step-by-Step Guide to Drawing a Generator
Now for the fun part. This is where you actually start drawing. Follow each step carefully, and don’t rush. Take your time to get the shapes right before adding details.
Step 1: Sketch the Outer Frame
Start with the simplest shape you can. Most generators have a rectangular or cylindrical frame. Draw a light rectangle using your HB pencil. Keep your lines loose and light at this stage. You want to be able to erase and adjust easily.
If you’re drawing a more realistic generator, try a rounded rectangle shape. Real-world generators often have slightly curved edges rather than sharp corners. This small detail adds authenticity to your drawing.
Use your ruler to keep the lines straight and even. Pay attention to proportions. A generator frame is usually wider than it is tall. Make sure your rectangle reflects that.
Step 2: Draw the Rotor Inside
The rotor sits inside the stator. Draw a smaller circle or oval in the center of your frame. This represents the spinning core of the generator. Keep it light and don’t press too hard on the pencil.
Add a small line extending from one side of the rotor. This is the shaft. The shaft is what connects the rotor to the engine or turbine that provides the mechanical energy. Without the shaft, your generator drawing will look incomplete.
Step 3: Add the Stator Coils
The stator wraps around the outside of the rotor. Draw several curved lines following the inner edge of your frame. These represent the wire coils. Space them evenly around the perimeter for a clean look.
Here’s a quick tip. Don’t try to draw every single coil perfectly. Generators have dozens of windings. For a beginner drawing, five to seven evenly spaced coil arcs look realistic and are much easier to manage.
Step 4: Include the Commutator and Brushes
On one end of the rotor shaft, draw a small cylinder shape. This is the commutator. It’s a split ring that reverses current direction as the rotor spins. Draw two small lines extending from the commutator to the brushes.
The brushes are small rectangles that press against the commutator. Keep them simple. They don’t need a lot of detail in a beginner drawing.
Step 5: Label All Components
This step separates a casual sketch from a proper generator diagram. Go through your drawing and add labels to each part. Use thin leader lines (thin lines with arrows) pointing to each component.
Write the name of each part next to its leader line. Keep your handwriting neat and consistent. Here’s a suggested label list:
- Stator
- Rotor
- Shaft
- Commutator
- Brushes
- Coils
- Frame
Labeling your drawing shows that you understand how a generator works. It also makes your diagram useful for study or presentation purposes.
Step 6: Add Shading and Depth
Now make your drawing look three-dimensional. Use your 2B pencil to add shading on one side of the frame and rotor. The side facing away from your light source should be darker.
Add hatching lines along the coils to show their texture. Light, parallel lines work best for shading. Don’t press too hard. Build up the darkness gradually with multiple light passes.
Shading the inside of the frame gives the impression that you can see through to the inner components. This technique makes your drawing look professional and polished.
Step 7: Clean Up and Finalize
Go over your drawing with a fresh eraser. Remove any construction lines that are no longer needed. Smooth out any rough edges. Then trace over your final lines with a darker pencil or pen.
Step back and look at your drawing from a distance. Does it look balanced? Are the proportions correct? Make any final adjustments at this stage.
Common Mistakes Beginners Make When Drawing Generators
Everyone makes mistakes when learning something new. The good news is that most common errors are easy to avoid once you know what they are.
Skipping the Research Phase
The biggest mistake beginners make is jumping straight into drawing without studying the subject. Spend at least 10 minutes looking at real generator images before you start. Notice the shapes, proportions, and how the parts relate to each other.
Getting the Proportions Wrong
A rotor that’s too big or a frame that’s too small will throw off your entire drawing. Use light construction lines to map out the basic shapes first. Check proportions against your reference images before adding details.
Forgetting the Shaft
It sounds obvious, but many beginners forget to draw the shaft. The shaft is a critical part of any generator. It’s what transfers mechanical energy from the engine to the rotor. Without it, your drawing doesn’t tell the full story.
Overcomplicating the Details
Resist the urge to add every tiny detail on your first drawing. Focus on the major components first. You can always add more complexity as your skills improve. A clean, simple drawing is always better than a messy, over-detailed one.
Taking Your Generator Drawings to the Next Level
Once you’ve mastered the basics, there are several ways to advance your skills and create more impressive generator illustrations.
Try Different Viewpoints
Don’t just draw a generator from the front. Try a side view, a top-down view, or even a cross-section diagram. A cross-section shows the internal components in detail and looks especially professional.
Add Electrical Diagram Elements
If you’re creating a technical drawing, consider adding electrical symbols. Show how the coils connect to the output terminals. This type of generator schematic drawing is incredibly useful for students and engineers.
Use Color Coding
Adding color to your drawing makes it easier to read and more visually appealing. Use one color for the stator, another for the rotor, and a third for the electrical connections. Color coding helps viewers understand your diagram at a glance.
Create a Cutaway Drawing
A cutaway drawing removes part of the outer frame to reveal the inner workings. This technique is popular in technical manuals and textbooks. It shows the relationship between the rotor, stator, and shaft in a way that a standard outline drawing can’t.
How Generator Drawings Connect to Real-World Applications
Understanding how to draw a generator isn’t just an artistic exercise. It has real practical value in many fields.
Engineers use generator drawings to plan installations and troubleshoot problems. Electricians reference diagrams when wiring generators to breaker boxes or connecting them to home electrical systems. Students study generator illustrations to understand how electrical energy is produced.
When you learn to draw a generator, you also learn how the machine works. This knowledge helps you make better decisions about what size generator to run a house or how to maintain your own equipment. Drawing forces you to think about each component and how it fits into the bigger picture.
If you’re interested in home power systems, check out our guide on how to wire a generator to a breaker box. Understanding the electrical connections makes your generator drawings more accurate and useful.
Similarly, knowing the how much gas does a generator use helps you specify runtime and fuel tank size in your technical drawings. These practical details add depth and realism to your illustrations.
Tips for Practicing and Improving
Like any skill, drawing generators gets easier with practice. Here are some tips to help you improve steadily.
- Draw every day: Even 15 minutes of practice makes a difference over time.
- Copy professional diagrams: Start by tracing or copying existing generator diagrams to build your skills.
- Use grid paper: Grid paper helps you maintain accurate proportions and alignment.
- Get feedback: Share your drawings with classmates, friends, or online communities. Constructive feedback helps you spot areas for improvement.
- Study engineering textbooks: Technical drawing books teach you standard symbols and conventions used in electrical diagrams.
- Don’t compare yourself to experts: Everyone starts somewhere. Celebrate your progress, no matter how small.
The most important thing is to enjoy the process. Drawing should feel rewarding, not stressful. Pick up your pencil, follow the steps in this guide, and watch your skills grow.
Conclusion
Learning how to draw a generator is a valuable skill that combines technical knowledge with artistic ability. You now know the basic components, the step-by-step drawing process, and the common mistakes to avoid. More importantly, you have a roadmap for continuing to improve your skills over time.
Start with simple outlines. Add components gradually. Label everything clearly. And most of all, practice regularly. Each drawing you complete brings you one step closer to creating professional-quality generator diagrams.
Whether you’re a student, a hobbyist, or a professional, the ability to draw a clear, accurate generator diagram is a skill that serves you well. Grab your pencils, open your reference images, and start drawing today. You’ll be surprised at how quickly your confidence and ability grow.
Frequently Asked Questions
Do I need artistic talent to draw a generator?
Not at all. You just need patience and a willingness to follow steps. Basic shapes like rectangles, circles, and lines make up most of a generator drawing. Anyone can learn these fundamentals with a little practice.
What is the easiest type of generator to draw for beginners?
A simple rectangular-frame generator with a visible rotor and stator is the easiest to start with. Avoid complex cross-sections or detailed electrical schematics until you’ve built confidence with basic shapes.
Should I draw by hand or use digital software?
Both approaches have value. Hand drawing builds fundamental observation skills. Digital drawing offers precision and easy editing. Try both and see which style suits your learning pace and goals.
How long does it take to learn how to draw a generator?
Most beginners can create a basic, labeled generator diagram within a few hours of practice. Mastering more detailed technical drawings takes weeks or months of consistent effort. The key is regular practice.
Can drawing a generator help me understand how it works?
Absolutely. When you draw each component and label its function, you reinforce your understanding of how the generator produces electricity. Many engineers say that drawing a machine is one of the best ways to truly understand it.
Are there online tools specifically for drawing generator diagrams?
Yes. Tools like AutoCAD, Figma, and free options like Inkscape and Lucidchart offer templates for electrical and mechanical diagrams. These tools can help you create polished generator drawings without advanced artistic skills.