How to Test an AC Compressor on a Car the Easy Way
Testing your car AC compressor is easier than you think. This guide walks you through every step to check the compressor clutch, refrigerant pressure, and electrical connections. You will learn to spot early signs of failure and avoid costly car AC repair bills.
Your car AC compressor is the heart of your entire cooling system. When it stops working, your vehicle becomes an oven on wheels. Testing the compressor might sound like a job for a mechanic, but it is actually something you can do at home with basic tools and a little patience.
In this guide, we will show you how to test an AC compressor on a car the easy way. You will learn simple checks that anyone can do. We will cover visual inspections, electrical tests, pressure checks, and listening tests. By the end, you will know exactly what is going on with your car AC compressor and whether it needs repair or replacement.
Whether your car AC blows warm air or makes strange noises, this guide has you covered. Let us get into it.
Key Takeaways
- Visual inspection is your first step: Look for leaks, damage, and belt wear before testing anything.
- Check the compressor clutch engagement: A clutch that fails to engage is a clear sign of trouble.
- Use a multimeter to test electrical connections: This helps you rule out wiring and relay problems.
- Monitor refrigerant pressure with gauges: Low pressure often points to a failing compressor or a leak.
- Listen for unusual noises: Grinding or squealing sounds can mean internal compressor damage.
- Safety first: Always wear gloves and eye protection when working with refrigerant and electrical parts.
- Know when to call a pro: Some compressor issues require professional diagnostic tools and expertise.
📑 Table of Contents
- Why Testing Your AC Compressor Matters
- Tools You Will Need
- Step 1: Visual Inspection
- Step 2: Test the Compressor Clutch
- Step 3: Electrical Testing with a Multimeter
- Step 4: Check Refrigerant Pressure
- Step 5: Listen for Unusual Noises
- Common Mistakes to Avoid When Testing
- When to Call a Professional
- How to Prevent Future Compressor Problems
- Conclusion
Why Testing Your AC Compressor Matters
The AC compressor does the heavy lifting in your car cooling system. It pressurizes the refrigerant and moves it through the system. Without a working compressor, your car AC simply cannot cool the cabin.
Ignoring compressor problems can lead to bigger issues. A small refrigerant leak can turn into a full system failure. A worn serpentine belt can damage other engine parts. The sooner you test and diagnose the problem, the more money you save.
Here are some common signs that your compressor might be failing:
- Warm air from the vents even when the AC is on full blast
- Strange noises like grinding, squealing, or clicking when you turn on the AC
- Compressor clutch not engaging when you switch on the AC
- Visible refrigerant leaks under the car
- Frequent AC cycling where the system turns on and off rapidly
These symptoms tell you it is time to test the compressor. Do not wait until your car AC stops working completely.
Tools You Will Need
Before you start, gather the right tools. You do not need anything fancy. Most of these items are affordable and easy to find at any auto parts store.
Here is what you need to test your AC compressor:
- Multimeter for testing electrical connections and voltage
- AC pressure gauge set to check refrigerant levels
- Basic hand tools like wrenches and screwdrivers
- Safety glasses and gloves for protection
- Flashlight for inspecting hard-to-see areas
- OBD2 scanner (optional) for reading error codes
Having these tools ready will make the testing process smooth and efficient. You will not need to stop halfway through to find something.
Step 1: Visual Inspection
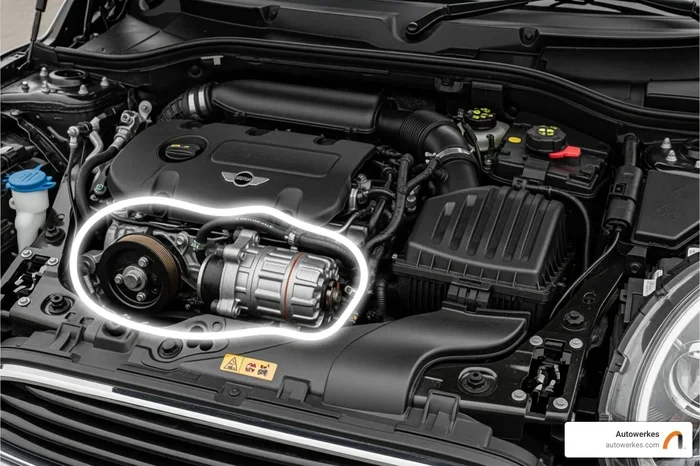
Start with a simple visual check. This is the easiest and fastest way to spot obvious problems. Walk around the front of your engine and locate the AC compressor. It is usually a small, cylindrical component driven by the serpentine belt.
Check the Serpentine Belt
Look at the belt that runs to the compressor. A cracked or loose belt can prevent the compressor from working properly. If the belt looks worn or damaged, replace it first before testing the compressor itself.
Inspect for Refrigerant Leaks
Look for oily residue around the compressor fittings and hoses. This oily film is a telltale sign of a refrigerant leak. Even a small leak can cause your AC system to lose pressure and stop cooling.
Examine the Compressor Body
Check the compressor housing for any physical damage. Dents, corrosion, or oil stains on the outside of the unit are red flags. Damage to the compressor body often means internal failure.
Quick Tip: If you see frost or ice buildup on the compressor, this could indicate a refrigerant restriction or low charge. Both issues affect compressor performance.
Step 2: Test the Compressor Clutch
The compressor clutch is the part that engages and disengages the compressor. When you turn on the AC, the clutch should engage and spin the compressor pulley. If it does not, you have a problem.
How to Check Clutch Engagement
Start the engine and turn the AC to maximum cold. Go to the front of the car and watch the compressor pulley. The clutch should engage, pulling the pulley into the compressor. You will see the entire pulley spin.
If the clutch does not engage, there could be several reasons:
- Low refrigerant charge — the system has a safety switch that prevents engagement
- Faulty compressor relay — the relay that sends power to the clutch may be bad
- Wiring issue — a broken wire or loose connector can prevent the signal from reaching the clutch
- Bad AC pressure switch — this switch monitors system pressure and prevents engagement if pressure is too low
You can test the clutch with a direct 12V power source. Disconnect the electrical connector from the compressor. Use a jumper wire to apply 12V directly to the clutch connector. If the clutch engages, the compressor itself is fine and the problem is in the electrical circuit or pressure switch.
Important: Always disconnect the power before working on any electrical connections. Safety comes first when dealing with car electrical systems.
Step 3: Electrical Testing with a Multimeter
Electrical problems are one of the most common reasons an AC compressor fails to work. Testing the wiring and connections with a multimeter can reveal these issues quickly.
Test the Compressor Relay
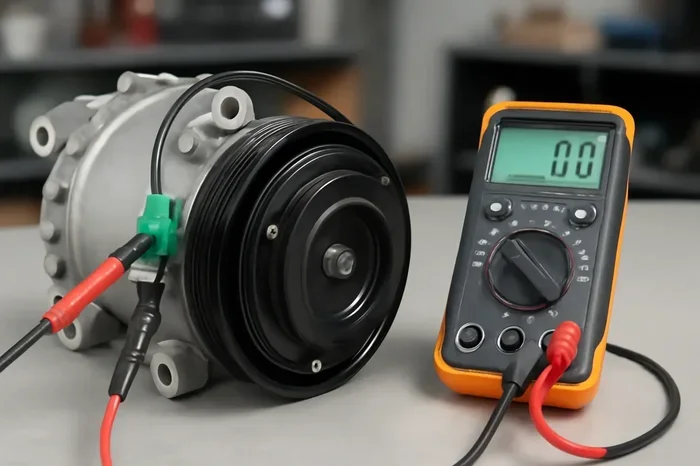
The compressor relay controls power to the clutch. You can test it with your multimeter. Remove the relay from its socket and set your multimeter to the continuity setting. Check the terminals for proper continuity. If there is no continuity, the relay is bad and needs replacement.
Also check the relay socket for power. Turn the ignition on and set the AC to maximum. Use your multimeter to check if the socket receives voltage. No voltage at the socket means the problem is upstream, possibly in the wiring or the AC control module.
Check Wiring and Connectors
Inspect all wiring leading to the compressor. Look for frayed wires, corroded connectors, or loose pins. A damaged wire can prevent the clutch signal from reaching the compressor. Clean any corroded connectors and re-seat them firmly.
You can also use your multimeter to test for voltage drop across the wiring. A significant voltage drop indicates resistance in the circuit, which can prevent the compressor from engaging properly.
Note: Working with car electrical systems can be tricky. If you are not comfortable, consider consulting a professional mechanic for electrical diagnosis.
Step 4: Check Refrigerant Pressure
Refrigerant pressure is a critical part of your car AC system. Both low and high pressure can indicate compressor problems or other issues in the system.
Connect the Pressure Gauges
Connect your AC pressure gauge set to the service ports on the compressor. The low-side port is usually on the larger line, and the high-side port is on the smaller line. Check the pressure readings against the manufacturer specifications.
Normal low-side pressure should be around 25-45 PSI when the AC is running. Normal high-side pressure should be around 200-250 PSI. These numbers vary by vehicle, so always check your owner manual for the exact specs.
What Low Pressure Means
Low pressure on both sides usually means a refrigerant leak. The compressor may be running but cannot build proper pressure without enough refrigerant. In this case, you need to find and fix the leak before recharging the system.
Low pressure on the low side and high pressure on the high side can indicate a clogged expansion valve or a failing compressor that cannot compress properly.
What High Pressure Means
High pressure on the high side can be caused by a blocked condenser, overcharged refrigerant, or a failing compressor. If the pressure is extremely high, stop the test immediately. Running the system at dangerous pressures can cause further damage.
Always handle refrigerant with care. Wear gloves and eye protection. Refrigerant can cause frostbite on contact and is harmful to the environment.
Step 5: Listen for Unusual Noises
Your ears are one of the best diagnostic tools you have. A healthy AC compressor should run smoothly and quietly. Any unusual sounds can point to internal problems.
Common Noises and What They Mean
- Grinding noise: Worn internal bearings or damaged piston rings. This often means the compressor needs replacement.
- Squealing noise: A slipping serpentine belt or worn clutch bearing. Check the belt tension and condition first.
- Clicking noise: Could be a loose component or a failing electromagnetic clutch. Have it checked promptly.
- Knocking noise: Loose compressor mounting bolts or internal mechanical failure. Do not ignore this sound.
Turn the AC on and listen carefully to the compressor area. Have someone else turn the AC on and off while you listen. You may notice the noise only occurs during engagement or at certain speeds.
Sometimes the noise is not coming from the compressor itself but from nearby components. The idler pulley, belt tensioner, or other accessories can produce similar sounds. Narrow down the source before jumping to conclusions.
Common Mistakes to Avoid When Testing
Many people make mistakes when testing their AC compressor that lead to wrong diagnoses or even further damage. Here are the most common ones to avoid.
- Skipping the visual inspection: You might miss an obvious leak or belt problem that is causing the compressor to fail.
- Not checking the refrigerant level first: Low refrigerant is the most common reason a compressor clutch will not engage. Always check pressure before assuming the compressor is bad.
- Ignoring the AC pressure switch: A faulty pressure switch can prevent clutch engagement even when the compressor is fine.
- Using the wrong gauge readings: Every vehicle has different specifications. Always compare your readings to your car manual.
- Forgetting about the serpentine belt: A worn belt can mimic compressor failure symptoms. Always inspect the belt before replacing the compressor.
Avoiding these mistakes will save you time and money. A thorough and systematic approach always gives the best results.
When to Call a Professional
Not every compressor problem can be fixed at home. Some situations require professional tools and expertise. You should call a mechanic if:
- The compressor clutch engages but the compressor does not build pressure
- You need to evacuate and recharge the AC system
- You suspect internal compressor damage and need a compression test
- The AC system has been contaminated with moisture or debris
- You have checked everything and still cannot identify the problem
A professional has access to specialized diagnostic equipment like AC recovery machines, vacuum pumps, and leak detection tools. These tools can pinpoint problems that basic testing cannot.
If you need to replace the compressor, a professional can also ensure the system is properly flushed and recharged. This is critical for the long-term health of your car AC system.
How to Prevent Future Compressor Problems
Once you have tested and fixed your AC compressor, you want to keep it working. Prevention is always better than cure. Here are some simple tips to extend the life of your car AC compressor.
- Run your AC regularly: Even in winter, run the AC for a few minutes each week. This keeps the seals lubricated and prevents them from drying out.
- Check refrigerant levels annually: Low refrigerant puts extra strain on the compressor. Keeping levels correct reduces wear.
- Replace the cabin air filter: A clogged filter restricts airflow and forces the system to work harder.
- Inspect the serpentine belt: Replace the belt at the first sign of wear. A good belt protects the compressor.
- Address leaks immediately: Even small leaks can lead to compressor failure over time. Fix them as soon as you notice them.
These simple habits can add years to the life of your car AC compressor. A little maintenance goes a long way.
Testing your AC compressor does not have to be scary. With the right tools and a systematic approach, you can diagnose most problems yourself. Start with a visual inspection, check the clutch engagement, test the electrical connections, monitor refrigerant pressure, and listen for unusual sounds. These five steps cover the basics of how to test an AC compressor on a car the easy way.
Remember, safety always comes first. Wear protective gear, work carefully, and do not hesitate to call a professional when needed. Your car AC compressor works hard for you every time you turn on that cold air. A little attention and care will keep it running strong for miles to come.
If you are dealing with other car equipment issues, check out our guide on how long a generator can run for more useful troubleshooting tips. And if you are concerned about safety when working with electrical or mechanical equipment, our article on what to do if exposed to an ozone generator offers important safety guidance for handling equipment that involves chemical or electrical components.
Also, if you are working on your car in various weather conditions, our piece on can a generator get wet provides helpful advice on protecting equipment from moisture and weather damage. These resources complement your car maintenance knowledge and help you stay prepared for any situation.
Conclusion
Testing an AC compressor on a car is a straightforward process when you follow the right steps. You do not need to be a mechanic to check the clutch, test the electrical connections, or monitor refrigerant pressure. With basic tools and a little knowledge, you can diagnose most compressor issues yourself.
Start with a visual inspection to catch obvious problems. Move on to the clutch engagement test to see if the compressor responds. Use a multimeter to check the electrical side. Connect pressure gauges to monitor system health. And always trust your ears to catch unusual sounds.
How to test an AC compressor on a car becomes easy when you break it down into these simple steps. Take your time, be methodical, and do not skip any checks. Your car AC compressor will thank you for the care and attention.
Now you have the knowledge to tackle this common car problem with confidence. Grab your tools, pop the hood, and get started. Your cool and comfortable rides are just a few steps away.
Frequently Asked Questions
How do I know if my AC compressor is bad?
Common signs include warm air from the vents, strange noises like grinding or squealing, and a compressor clutch that does not engage when you turn on the AC. You can also check refrigerant pressure with a gauge set to see if the compressor is building proper pressure.
Can I drive my car with a bad AC compressor?
Yes, you can still drive your car, but the AC will not work. However, if the compressor is seized, it can put extra strain on the serpentine belt and affect other engine accessories. It is best to address the problem sooner rather than later.
How much does it cost to replace a car AC compressor?
The cost varies depending on your vehicle model and the extent of the damage. On average, you can expect to pay between $500 and $1,000 for parts and labor. Getting a proper diagnosis first will help you avoid unnecessary expenses.
Do I need to evacuate the AC system before testing the compressor?
No, basic compressor testing does not require evacuating the system. You can check the clutch engagement, electrical connections, and listen for noises without disconnecting the refrigerant. However, if you need to service the system or replace the compressor, professional evacuation is required.
What causes an AC compressor to fail?
Common causes include low refrigerant levels, refrigerant leaks, worn serpentine belts, electrical failures, and lack of regular use. Internal wear over time also causes compressor failure. Regular maintenance can help prevent many of these issues.
Is it safe to test an AC compressor myself?
Yes, it is safe as long as you take proper precautions. Wear gloves and eye protection, especially when handling refrigerant or electrical connections. Work on a cool engine and avoid contact with moving parts like the serpentine belt and compressor pulley.