Phone Repair Tool Kit to Save Money and Fix Devices
A phone repair tool kit gives you everything you need to fix your device at home. It saves you hundreds of dollars compared to professional repair shops. With the right tools, you can replace screens, batteries, and more in minutes. This guide covers every essential tool, buying tips, and step-by-step repair advice. You will learn how to choose the best kit and avoid costly mistakes.
Key Takeaways
- A quality phone repair tool kit includes all the essential tools you need for common repairs.
- DIY phone repair can save you 50-80% compared to professional repair costs.
- Choosing the right kit depends on your phone model, repair experience, and budget.
- Using proper tools like spudgers, suction cups, and precision screwdrivers prevents damage.
- Common mistakes include using the wrong screwdriver size and skipping anti-static precautions.
- Most phone repairs take under 30 minutes once you have the right kit and guide.
📑 Table of Contents
- What Is a Phone Repair Tool Kit?
- Essential Tools Every Phone Repair Tool Kit Should Have
- Why Investing in a Phone Repair Tool Kit Saves You Money
- How to Choose the Best Phone Repair Tool Kit
- Step-by-Step Guide to Using Your Phone Repair Tool Kit
- Common Mistakes to Avoid When Repairing Your Phone
- Expert Insights on Phone Repair Tool Kits
- How to Maintain Your Phone Repair Tool Kit
- Conclusion
What Is a Phone Repair Tool Kit?
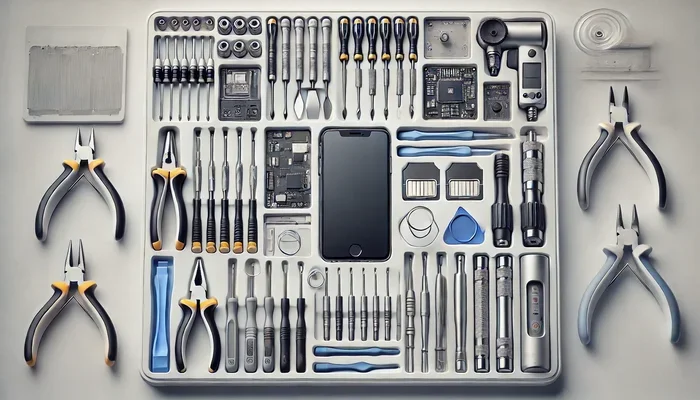
A phone repair tool kit is a collection of specialized tools designed to open, repair, and maintain mobile devices. These kits contain everything from screwdrivers to pry tools. They are built specifically for the tiny, delicate components inside smartphones.
Most kits come in a compact case or bag. This makes them easy to store and carry. Whether you want to replace a cracked screen or swap a dead battery, the right tools make the job much easier.
Popular brands like iFixit and TOPELEAD offer some of the best kits on the market. You can find options for iPhones, Samsung devices, and many other models. A good phone repair tool kit is an investment that pays for itself quickly.
Many people assume phone repair is only for professionals. That is simply not true anymore. With a quality toolkit and a repair guide, almost anyone can fix their own device. Let us explore what makes these kits so valuable.
Why People Are Switching to DIY Phone Repair
The cost of professional phone repair has skyrocketed. Replacing a screen at a shop can cost anywhere from 100 to 400 dollars. That is a lot of money for a simple fix. A phone repair tool kit costs a fraction of that price.
Beyond savings, DIY repair gives you control. You know exactly what parts go into your device. You do not have to wait days for a repair appointment. Many people also find the process rewarding and educational.
Online resources like YouTube and iFixit make learning easy. You can watch step-by-step repair videos for your specific phone model. The combination of a good toolkit and online guidance makes home repair very accessible.
Essential Tools Every Phone Repair Tool Kit Should Have
Not all kits are created equal. Some include dozens of tools while others are bare-bones. To get the most value, you need to understand what each tool does. Here is a breakdown of the must-have items in any phone repair tool kit.
Precision Screwdrivers
Screws inside phones are tiny and specific. Using the wrong screwdriver can strip them permanently. A quality kit includes Phillips, Torx, and Pentalobe drivers. These come in very small sizes like PH000 and T3.
Look for kits with magnetic tips. The magnet helps hold screws in place while you work. This prevents tiny screws from falling into places you cannot reach. Magnetic screwdrivers are a game-changer for phone disassembly.
Spudgers and Pry Tools
A spudger is a flat, thin tool used to pry open phone cases. It slides between the screen and the frame without causing damage. Plastic spudgers are ideal for beginners because they will not scratch surfaces.
Metal spudgers work well for tougher tasks. Some kits include both plastic and metal versions. You will use pry tools to remove adhesive strips and separate components. They are essential for screen replacements and battery swaps.
Suction Cups
A suction cup is one of the most useful tools for pulling up screens. It creates a strong grip on smooth glass surfaces. This allows you to lift the screen gently without cracking it further.
Suction cups are especially helpful during screen replacement repairs. They give you a firm hold to pull the display assembly away from the frame. Most quality phone repair tool kit options include at least one suction cup.
Tweezers
Phone internals are full of tiny parts. SIM cards, antenna connectors, and screws are all very small. Tweezers let you handle these delicate pieces with precision and care.
Anti-static tweezers are the best choice. They prevent static electricity from damaging sensitive components. Look for fine-point tweezers with a smooth grip. Spring-loaded tweezers are also popular for quick, easy use.
Heat Gun or iOpener
Modern phones use strong adhesive to hold screens and batteries in place. A heat gun or iOpener softens this adhesive so you can remove parts safely. Never use a direct flame or excessive heat.
An iOpener is a reusable heat pack that warms up in the microwave. It provides gentle, even heat perfect for phone repairs. A heat gun on low settings also works well. These tools make adhesive removal much safer and faster.
SIM Ejector Tool and Other Small Accessories
Every phone has a SIM card tray. The ejector pin is a tiny tool that pops it open. Many kits include a SIM ejector tool, but a paperclip works too. However, having the proper tool is always better.
Other useful accessories include anti-static mats, adhesive strips, and cleaning brushes. An anti-static mat protects your phone from static damage while you work. Cleaning brushes remove dust from internal components before reassembly.
Why Investing in a Phone Repair Tool Kit Saves You Money
The financial benefits of a phone repair tool kit are hard to ignore. Let us look at the numbers. A professional screen repair typically costs between 150 and 350 dollars. A battery replacement at a shop runs 50 to 100 dollars.
A quality phone repair tool kit costs between 20 and 60 dollars. Even the most expensive kits rarely exceed 100 dollars. One successful DIY repair pays for the entire kit many times over.
Real Savings Over Time
Think about how often your phone might need repair. Screen cracks happen to almost everyone at some point. Batteries degrade after two to three years of use. Charging ports wear out from daily plugging and unplugging.
If you face two repairs per year, that could cost 400 to 800 dollars at a shop. With a phone repair tool kit and replacement parts, you might spend 50 to 100 dollars total. The savings add up quickly over the life of your device.
Beyond Money: The Satisfaction of DIY Repair
Saving money is great, but the benefits go deeper. You learn how your device works inside and out. This knowledge helps you make better decisions about maintenance and repairs. You also gain confidence in handling technical problems.
Many DIY repairers say they feel more connected to their devices. You understand what goes into keeping your phone running well. This awareness often leads to better care and longer device lifespan.
Repairing Before Selling for Extra Value
A working phone sells for much more than a broken one. If you plan to upgrade, fixing minor issues before selling adds real value. A fresh screen or new battery makes your device attractive to buyers.
With your phone repair tool kit, you can make these improvements cheaply. The extra resale value often covers the cost of the kit and replacement parts. It is a smart move for anyone who upgrades phones regularly.
How to Choose the Best Phone Repair Tool Kit
Not every phone repair tool kit is right for everyone. Your choice should depend on your phone model, experience level, and what repairs you plan to do. Here is a guide to help you pick the perfect kit.
Match the Kit to Your Phone Model
Different phones use different screw types and sizes. iPhones use Pentalobe and Phillips screws. Most Android phones use Phillips and Torx drivers. Some newer Samsung devices use tri-point screws.
Check that your kit includes drivers for your specific phone. Many kits are labeled as universal, but some are phone-specific. If you mainly repair iPhones, look for an iPhone-focused kit. If you have multiple devices, a universal kit is the better choice.
Consider Your Experience Level
Beginners should start with a basic kit. Look for kits that include plastic spudgers, a suction cup, and a variety of screwdrivers. These kits are simple to use and hard to misuse.
Intermediate and advanced users may want more specialized tools. Heat guns, anti-static mats, and precision tweezers become more important. Some kits also include repair guides and instructional videos. These extras are very helpful for less experienced users.
Read Reviews and Check What Comes in the Box
Before buying, read customer reviews carefully. Look for feedback on tool quality and durability. Cheap tools can break during a repair and cause more damage. Invest in kits from reputable brands with solid reviews.
Check the complete list of included tools before purchasing. Make sure it has everything you need for your planned repairs. A kit missing one critical tool can leave you stuck mid-repair.
Price vs. Quality
You do not need to spend a fortune on a phone repair tool kit. However, extremely cheap kits often have poor-quality tools. Look for kits in the 30 to 60 dollar range for the best balance of quality and value.
Some premium kits cost over 100 dollars. These usually include premium materials and extra accessories. For most users, a mid-range kit provides everything needed for common repairs. Save the premium options for professional-level work.
Step-by-Step Guide to Using Your Phone Repair Tool Kit
Using a phone repair tool kit for the first time can feel intimidating. But the process is simpler than most people think. Follow these steps for a smooth and successful repair.
Step 1: Gather Your Tools and Workspace
Clear a clean, flat workspace with good lighting. Lay out your anti-static mat if you have one. Open your toolkit and lay out all the tools you will need. Having everything organized prevents mistakes and frustration.
Make sure your hands are clean and dry. Oils and moisture can damage phone components. Work on a soft surface like a microfiber cloth to prevent scratches. Keep small screws in a magnetic tray or bowl to avoid losing them.
Step 2: Power Off Your Device
This step cannot be stressed enough. Always power off your phone before starting any repair. Working on a powered device risks short circuits and permanent damage. Remove the SIM card and any memory cards as well.
For phones with removable batteries, take the battery out. For sealed batteries, you will need to disconnect the battery connector after opening the case. This is a critical safety step that many beginners skip.
Step 3: Open the Phone
Use your suction cup to grip the screen. Pull gently to create a small gap between the screen and the frame. Insert your plastic spudger into the gap. Slide it along the edges to break the adhesive seals.
Work slowly and carefully around the entire perimeter. Do not force anything. If a section feels stuck, apply heat from your iOpener or heat gun for a few seconds. Then try again. Patience is the key to clean phone disassembly.
Step 4: Disconnect Internal Components
Once the case is open, you will see ribbon cables and connectors. Use your spudger or tweezers to gently disconnect them. Always pull from the connector, not the cable itself. This prevents damage to delicate flex cables.
Remove screws carefully and keep track of their locations. Different screws often have different lengths. Mixing them up can damage your device. Use a screwdriver mat or label to organize screws by size and position.
Step 5: Perform the Repair
Now you can perform the actual repair. Whether it is a screen replacement, battery swap, or charging port fix, follow the specific steps for your phone model. iFixit offers free, detailed repair guides for hundreds of devices.
Handle new replacement parts with care. Avoid touching the screen surface with bare fingers. Oils from your skin can affect adhesive bonding and screen clarity. Use the included adhesive strips or new adhesive for a secure fit.
Step 6: Reassemble and Test
Reverse the disassembly steps to put your phone back together. Reconnect all cables and components. Secure screws in their correct locations. Do not overtighten any screws, as this can strip threads or crack components.
Power on your device and test everything. Check the screen, touch response, speakers, and charging port. If something does not work, power off and double-check your connections. A successful reassembly is the final and most satisfying step of any repair.
Common Mistakes to Avoid When Repairing Your Phone
Even with the best phone repair tool kit, mistakes can happen. Knowing what to avoid saves you time, money, and frustration. Here are the most common errors beginners make.
Using the Wrong Screwdriver Size
This is the number one mistake in phone repair. Using a slightly too-large or too-small screwdriver strips screws. Stripped screws are extremely difficult to remove and can ruin your repair. Always double-check screwdriver size before driving any screw.
Invest in a quality screwdriver set with clear size markings. If a screw resists, stop and check your fit. Forcing a wrong screwdriver causes damage that is often irreversible.
Skipping Anti-Static Precautions
Static electricity can destroy phone components without you even noticing. Always use an anti-static mat or wrist strap when opening your device. Work on a non-conductive surface and avoid carpeted rooms.
Touch a grounded metal object before handling internal components. This discharges any static buildup from your body. Simple precautions like these prevent mysterious hardware failures after repair.
Forcing Parts Apart
If a component will not come apart easily, something is holding it in place. Check for hidden screws, clips, or adhesive. Forcing parts can crack screens, break connectors, and damage the motherboard.
Apply gentle heat to soften adhesive and try again. Use your spudger to carefully release clips. Patience and a gentle touch always produce better results than brute force.
Forgetting to Back Up Data
Before any repair, back up your phone completely. A repair gone wrong could result in data loss. Cloud backups and computer backups protect your photos, contacts, and files.
This step takes only a few minutes but saves hours of stress. Even if your repair goes perfectly, unexpected issues can arise. A backup ensures you never lose important data during the process.
Not Replacing Adhesive Properly
Many phone components rely on adhesive for a secure fit. Removing old adhesive without replacing it can cause parts to shift or come loose. Always use new adhesive strips or adhesive dots from your phone repair tool kit.
Clean old adhesive residue with isopropyl alcohol before applying new adhesive. This ensures a strong bond. Proper adhesive application keeps your repair secure and long-lasting.
Expert Insights on Phone Repair Tool Kits
We spoke with experienced repair technicians about what makes a great phone repair tool kit. Their insights reveal what separates a good kit from a great one.
First, tool quality matters more than quantity. A kit with 20 well-made tools beats a kit with 50 cheap ones. Look for tools made from hardened steel that resist bending and wear. The handles should feel comfortable and provide good grip.
Second, organization is key. The best kits come with a molded case that holds each tool in its place. This makes setup and cleanup fast and keeps tools from getting lost. It also protects the tools during storage and transport.
Third, look for kits that include repair guides or access to online resources. Written and video guides dramatically reduce the learning curve. Many experienced repairers recommend iFixit kits specifically for this reason. Their guides are detailed, accurate, and free to access.
Finally, do not overlook the importance of a good warranty. Reputable kit manufacturers stand behind their products. If a tool breaks or is missing, a warranty ensures you get support. This peace of mind is worth the slight premium on quality kits.
How to Maintain Your Phone Repair Tool Kit
Your phone repair tool kit will last longer with proper care. Simple maintenance habits keep tools in top condition for years of use.
Clean your tools after each use. Wipe screwdrivers and spudgers with a soft cloth to remove oils and debris. Store them in their designated slots to prevent dulling and damage. Keep the kit in a dry, cool place away from direct sunlight.
Check screwdriver tips regularly for wear. Dull tips strip screws more easily and can damage components. Replace worn tools promptly rather than forcing them to work. A well-maintained toolkit is always safer and more effective.
Sharpen or replace dull pry tools as needed. A sharp spudger slides cleanly between components without scratching. Dull tools require more force and increase the risk of accidental damage.
Conclusion
A phone repair tool kit is one of the smartest investments you can make for your smartphone. It saves you significant money, gives you independence from repair shops, and builds valuable skills. Whether you are fixing a cracked screen, replacing a worn battery, or swapping a faulty charging port, the right toolkit makes all the difference.
Choose a kit that matches your phone model and experience level. Use the tools carefully and follow reliable repair guides. Avoid common mistakes like using the wrong screwdriver or skipping anti-static precautions. With practice and patience, you can handle most common phone repairs yourself.
The satisfaction of fixing your own device is unmatched. You save money, learn something new, and extend the life of your phone. Start with a quality phone repair tool kit today, and discover how easy and rewarding DIY phone repair can be.
Frequently Asked Questions
What is included in a basic phone repair tool kit?
A basic phone repair tool kit typically includes precision screwdrivers, plastic spudgers, a suction cup, tweezers, and a SIM ejector tool. Some kits also include an iOpener or heat gun and an anti-static mat. These tools cover most common phone repairs like screen replacement and battery swaps.
Can I use a phone repair tool kit for any smartphone?
Most universal phone repair tool kit options work for various smartphone brands including iPhone, Samsung, Google Pixel, and more. However, check that your kit includes the right screwdriver types for your specific phone model. Some phones use unique screw types like Pentalobe or tri-point screws that require specialized drivers.
Is DIY phone repair safe for beginners?
Yes, DIY phone repair is safe for beginners when you use the right tools and follow detailed guides. Start with simple repairs like battery replacement before attempting screen swaps. A good phone repair tool kit includes tools designed to prevent damage, and online resources make the process easy to follow step by step.
How much money can I save with a phone repair tool kit?
A quality phone repair tool kit costs between 20 and 60 dollars. Professional repairs for the same issues can cost 150 to 400 dollars or more. One successful DIY repair typically saves you over 100 dollars. Over time, the savings can add up to hundreds or even thousands of dollars.
What is the most important tool in a phone repair tool kit?
The precision screwdriver set is arguably the most important tool in any phone repair tool kit. Stripped screws can ruin a repair and damage your device. Magnetic screwdrivers with multiple size options give you the control and precision needed for safe phone disassembly and reassembly.
How do I know if my phone repair tool kit is high quality?
High-quality phone repair tool kit options feature tools made from hardened steel, comfortable handles, and a well-organized carrying case. Check for reputable brands, positive customer reviews, and tools that feel solid in your hand. Kits that include repair guides and warranty support are also signs of a quality product.