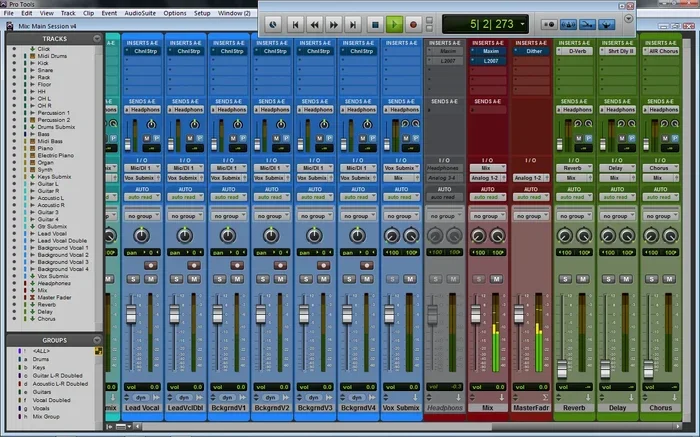
How to Color Tracks in Pro Tools for Better Mixing
Color coding tracks in Pro Tools is one of the fastest ways to improve your mixing workflow. When you learn how to color tracks in Pro Tools, you can spot instruments instantly, navigate sessions faster, and mix with greater precision. This guide walks you through every step, from basic track coloring to building a system that works for you. Whether you are a beginner or a seasoned engineer, these tips will transform the way you work in your DAW.
Mixing music is all about clarity. When you open a session with dozens of tracks, things can get messy fast. That is where track coloring comes in. Learning how to color tracks in Pro Tools gives you a visual map of your entire session. You can tell what each track does just by looking at its color. This simple trick saves time, reduces mistakes, and makes mixing feel a lot more fun.
Many producers skip track coloring because they think it takes too long. But the truth is, setting up colors takes only a few minutes. And the payoff is huge. You will navigate sessions faster, catch problems sooner, and work more confidently. In this article, we will walk you through every step of coloring tracks in Pro Tools. We will cover the basics, share smart strategies, and give you tips that real engineers use in the studio every day.
Key Takeaways
- Track coloring in Pro Tools helps you identify instruments and tracks at a glance.
- You can assign colors manually or use Pro Tools built-in presets.
- A consistent color system saves time and reduces errors during mixing.
- Color coding works hand in hand with track labeling and session organization.
- You can customize colors for every track type, including audio, MIDI, and aux tracks.
- Applying a standard color scheme keeps your sessions clean and professional.
📑 Table of Contents
- What Is Track Coloring in Pro Tools?
- Why Color Coding Matters for Mixing
- How to Assign Colors to Your Tracks
- Best Color Coding Strategies for Different Instruments
- Building a Consistent Color System
- Common Mistakes to Avoid When Coloring Tracks
- Advanced Tips for Pro Tools Track Coloring
- Keeping Your Session Organized Beyond Colors
- Final Thoughts on Coloring Tracks in Pro Tools
What Is Track Coloring in Pro Tools?
Track coloring means assigning a specific color to each track in your Pro Tools session. Every track has a small colored bar on the left side of the track header. You can change that color to anything you want. The goal is to make your session easier to read and navigate.
Think of it like a traffic light system for your music. Red might mean drums. Blue might mean bass. Green might mean guitars. When you see those colors, you know exactly what you are looking at without even reading the track name. This visual shortcut is incredibly powerful, especially in large sessions with 50 or more tracks.
Why Does Pro Tools Use Color Coding?
Pro Tools gives you full control over track colors for a reason. The software is built for professional audio work. Engineers juggle complex sessions every day. Color coding helps them stay organized and focused. It is not just a nice feature. It is a core part of a good mixing workflow.
When you color your tracks, you create a system that your brain can understand instantly. You do not have to read every track name or guess what each one does. The colors tell you everything you need to know at a glance. This is especially helpful when you are working on a tight deadline or collaborating with other producers.
Why Color Coding Matters for Mixing
Color coding does more than make your session look pretty. It actually improves the way you mix. Here is why it matters so much.
- Faster navigation: You can jump to the right track without scrolling through a long list.
- Fewer mistakes: You are less likely to adjust the wrong track when colors help you identify them quickly.
- Better organization: A color system keeps your session clean and easy to follow.
- Improved focus: You can zero in on specific groups of instruments without distraction.
- Smoother collaboration: Other engineers can understand your session layout right away.
When you mix with colors, your brain processes information faster. You spend less time searching and more time making creative decisions. Over time, a good color coding system becomes second nature. You will wonder how you ever mixed without it.
How to Assign Colors to Your Tracks
Now let us get into the practical steps. Coloring tracks in Pro Tools is simple once you know where to look. Here is exactly how to do it.
Step 1: Open Your Session
Start by opening the Pro Tools session you want to work on. Make sure you are in Session View so you can see all your track headers clearly. If your session is very large, consider zooming out a bit so you can see the full layout.
Step 2: Select the Track
Click on the track you want to color. The track header will highlight, showing that it is selected. You can select multiple tracks at once by holding down the Shift key and clicking. This is useful when you want to color an entire group of tracks together.
Step 3: Open the Color Picker
Right-click on the track header. A menu will appear. Look for the Color option near the top. Click on it, and a color palette will open. You will see a wide range of colors to choose from.
Step 4: Pick Your Color
Click on the color you want to assign. The track header will change immediately. You will see the new color reflected on the track strip. Repeat this process for every track in your session.
Pro Tips: You can also use keyboard shortcuts to speed things up. On a Mac, press Command plus the number key for quick color access. On Windows, use Ctrl plus the number key. These shortcuts make the process much faster once you get comfortable with them.
Best Color Coding Strategies for Different Instruments
There is no single right way to color your tracks. But having a system makes a big difference. Here are some proven strategies that mix engineers use every day.
The Group-by-Instrument Approach
This is the most common method. You assign colors based on instrument groups. For example:
- Drums: Red or orange
- Bass: Blue or dark blue
- Guitars: Green
- Vocals: Yellow or bright pink
- Keyboards and Synths: Purple
- Aux and Master Tracks: Gray or white
This approach works well because it mirrors how you think about a mix. You naturally group instruments by type, and colors reinforce that grouping visually.
The Dynamic Range Approach
Some engineers prefer to color tracks based on their role in the mix. For instance:
- Lead vocals: Bright red (most important)
- Background vocals: Lighter red
- Drum overheads: Orange
- Kick and snare: Dark red
- Ambient tracks: Cool blue or green
This method helps you focus on the most critical elements first. It is especially useful during the early stages of a mix when you are still shaping the overall sound.
The Session Flow Approach
Another strategy is to color tracks based on their position in the session. Left to right, you might arrange colors from warm to cool. This creates a visual gradient that mirrors the arrangement of your song. It is a less common approach, but it can be very effective for certain types of projects.
Building a Consistent Color System
The real magic happens when you stick with one system across all your sessions. Consistency is the key to making track coloring truly useful. Here is how to build a system that lasts.
Create a Personal Color Chart
Write down your color assignments and keep them somewhere you can reference easily. It could be a sticky note on your monitor or a document on your desktop. When you always use the same colors for the same instruments, your brain builds strong associations. You will start recognizing tracks by color alone.
Use Pro Tools Track Presets
Pro Tools lets you save track presets, including color settings. Once you have a color scheme you love, save it as a preset. Next time you start a new session, you can load that preset and have your colors set up in seconds. This is a huge time saver, especially when you work on many projects.
Label Your Tracks Too
Color coding works best when paired with clear track labels. Never rely on color alone. Always name your tracks properly as well. Together, colors and labels create a complete visual system that makes your sessions easy to read for you and anyone else who opens them.
Common Mistakes to Avoid When Coloring Tracks
Even with the best intentions, it is easy to make mistakes with track coloring. Here are some pitfalls to watch out for.
- Using too many colors: If every track has a different color, the system breaks down. Stick to a limited palette.
- Forgetting to save your scheme: If you build a great system but do not save it, you lose it when the session closes.
- Ignoring track types: Make sure you color audio tracks, MIDI tracks, and aux tracks consistently.
- Overcomplicating the system: Keep it simple. If your color system requires a cheat sheet for every session, it is too complex.
- Not updating colors when tracks change: If you reassign a track during a session, update its color to match the new role.
Avoiding these mistakes keeps your workflow smooth and your sessions clean. A good system should feel effortless, not like extra work.
Advanced Tips for Pro Tools Track Coloring
Once you have the basics down, you can take your track coloring to the next level. Here are some advanced tips that experienced mix engineers use.
Use Color to Mark Problem Areas
Assign a specific color to tracks that need extra attention. Maybe it is a vocal track with background noise, or a drum track that needs more editing. When you see that color, you know exactly where to focus your energy. This is a great way to keep your session organized without relying on memory.
Create Color Groups for Bus Routing
When you route tracks to buses or aux channels, use matching colors. If your drum tracks are red and your drum bus is also red, you can follow the signal flow visually through the session. This makes it much easier to understand how your mix is structured and where each signal is going.
Export and Share Your Color Scheme
If you work with a regular group of musicians or producers, consider sharing your color scheme. You can export track layouts and color settings so everyone works with the same visual system. This is especially useful for remote collaboration, where team members might be working on different sessions in different locations.
Keeping Your Session Organized Beyond Colors
Track coloring is just one piece of the puzzle. A truly organized session combines colors with other smart practices. Here are a few things to keep in mind.
- Use track folders: Group related tracks into folders to keep your session tidy.
- Label clips clearly: Name every clip so you can find what you need fast.
- Use markers: Add markers at key points in your timeline for quick navigation.
- Save different versions: Keep backup versions of your session so you can experiment without fear.
All of these practices work together to create a session that is easy to work in. Track coloring is the visual layer that ties everything together. When you combine it with good naming, folder organization, and markers, you have a session that anyone can pick up and understand.
One thing many producers overlook is the physical setup of their studio. Having reliable power is essential for long mixing sessions. If you work in a location where power can be unstable, consider looking into how to power your house with a generator to keep your equipment running smoothly. Also, when setting up your workspace, make sure your generator is placed at a safe distance. You can learn more about how far your generator should be from your house to ensure safe operation. For those working in mobile studios or locations without reliable power, knowing what size generator you need for your tools is essential to keep everything running without interruption. And finally, understanding how much gas a generator uses helps you plan for those long creative sessions without worrying about running out of fuel.
Final Thoughts on Coloring Tracks in Pro Tools
Learning how to color tracks in Pro Tools is one of the simplest and most effective ways to improve your mixing workflow. It takes just a few minutes to set up, but the benefits last for every session you work on. You will navigate faster, mix with more confidence, and keep your projects organized from start to finish.
The key is to find a system that works for you and stick with it. Whether you use the group-by-instrument approach, the dynamic range method, or your own custom system, consistency is what makes it powerful. Start with the basics, build good habits, and refine your system over time. Before long, coloring your tracks will feel like second nature. And your mixes will be better for it.
Take some time today to revisit your current sessions. Add colors to any tracks that are missing them. Clean up any inconsistent schemes. You will be surprised at how much clearer your sessions feel with just a little bit of color. Happy mixing.
Frequently Asked Questions
Can I use custom colors in Pro Tools for track coloring?
Yes, Pro Tools lets you choose from a full color palette for each track. You can pick any color you want and assign it to any track header. This flexibility means you can build a system that matches your personal preferences perfectly.
Should I use the same color scheme for every session?
It is a great idea to use a consistent scheme across sessions. When you repeat the same colors for the same instruments, your brain learns the system faster. This saves you time and reduces confusion when you open new projects.
Can I color multiple tracks at once in Pro Tools?
Absolutely. You can select multiple tracks by holding Shift and clicking. Then apply one color to all selected tracks at once. This is very useful for coloring entire instrument groups like drums or backing vocals.
Does track coloring affect audio quality or playback?
No, track coloring is purely a visual tool. It has no effect on your audio quality, routing, or playback. It is designed to help you organize and navigate your session more efficiently.
What is the best way to remember my color assignments?
The best way is to create a simple reference chart and keep it near your workspace. You can also save track presets in Pro Tools that include your color settings. Over time, you will memorize the system naturally.
Can I share my colored session with other producers?
Yes, when you share a Pro Tools session file, the track colors travel with it. Other producers will see your color scheme exactly as you set it up. This makes collaboration smoother and keeps everyone on the same page.
=== CONCLUSION ===
Coloring tracks in Pro Tools is a small step that makes a big difference. It transforms messy sessions into organized, easy-to-read workspaces. You spend less time searching for tracks and more time making creative decisions that improve your mix. Start simple, stay consistent, and build a system that fits your workflow. Your future self will thank you every time you open a session and see a clean, color-coded layout staring back at you.