How to Build a Faraday Cage for a Generator at Home
This guide shows you exactly how to build a Faraday cage for a generator at home using simple, affordable materials. You’ll learn the best conductive options, a clear step-by-step build process, and how to test the shield for generator shielding effectiveness. By the end, you’ll have a reliable DIY Faraday cage that guards your power equipment against electromagnetic pulse damage and surges.
If you own a generator, you know how valuable it is during power outages. But have you ever thought about protecting it from invisible threats like lightning, power surges, or even an electromagnetic pulse? A Faraday cage does exactly that. It surrounds your generator with a shield that blocks stray electrical energy. In this guide, I’ll walk you through how to build a Faraday cage for a generator right at home. You don’t need advanced skills or expensive tools. With a few common materials and some basic steps, you can create a strong generator shielding enclosure. Let’s get started.
Building a DIY Faraday cage might sound like a project for engineers, but it’s simpler than you think. The idea is to wrap your generator in a conductive material that redirects electrical currents around the device. This keeps the inside safe. Many pre-made Faraday cages for sale exist, but building your own saves money and lets you customize the size. Whether you’re preparing for storms, camping trips, or just want extra surge protection, this project is worth your time. I’ll cover everything from materials to testing, so you can feel confident in your build.
Key Takeaways
- Build with conductive mesh: Copper or galvanized steel mesh creates an effective Faraday cage that blocks electromagnetic interference.
- Ground the cage properly: A solid grounding rod or wire safely directs energy away from your generator.
- Seal every gap: Overlapping mesh and conductive tape prevent radio frequency leakage and ensure full EMP protection.
- Use an insulated interior: A wooden or plastic base keeps the generator from touching the conductive walls.
- Test before trusting: A simple radio or multimeter check confirms your DIY Faraday cage is working.
- Maintain regularly: Inspect for rust, loose connections, and damaged mesh to keep your generator shielding reliable over time.
📑 Table of Contents
- What Is a Faraday Cage and Why Does Your Generator Need One?
- Materials You’ll Need to Build a Generator Faraday Cage
- Step-by-Step Guide to Building Your Own Faraday Cage
- Common Mistakes to Avoid When Building a Faraday Cage
- How to Test Your Faraday Cage for Effective Shielding
- Maintaining and Upgrading Your Generator Shield
- Why Building Your Own Faraday Cage Is Worth the Effort
What Is a Faraday Cage and Why Does Your Generator Need One?
A Faraday cage is an enclosure made of conductive material. It works by distributing electromagnetic energy around its exterior, leaving the inside unaffected. Think of it like a metal umbrella that redirects lightning. The cage doesn’t attract energy—it just channels it safely away. This principle has been used for centuries in radio frequency shielding and electrical safety.
How a Faraday Cage Blocks Electromagnetic Energy
When an external electromagnetic pulse or surge hits the cage, the conductive material lets the energy flow around it. The currents travel through the mesh or solid shell and exit the other side. Because the generator sits inside on an insulating surface, it never receives the surge. The cage acts like a magnetic field blocking shield. This is why generator shielding is so important for sensitive electronics and engines.
The Threat of EMP and Power Surges
Lightning strikes, downed power lines, or even a nearby solar storm can send a massive spike of electricity through the air. A standard generator has no built-in defense against these events. A Faraday cage gives you a layer of EMP protection that can save thousands of dollars in damage. It also guards against smaller, everyday surges that wear out your equipment over time. Investing in home generator protection is one of the smartest things you can do.
Materials You’ll Need to Build a Generator Faraday Cage
Before you start, gather everything you need. Using the right materials ensures your Faraday enclosure works properly. Here’s a list of what to collect.
- Conductive mesh: Copper mesh or galvanized steel wire cloth. Both are excellent for RF shielding.
- Wooden or plastic base: This keeps the generator from touching metal directly. Use a thick plywood or plastic pallet.
- Grounding rod: A copper or steel rod driven into the earth. This gives the cage a safe path for energy.
- Grounding wire: Heavy-gauge copper wire to connect the cage to the rod.
- Conductive tape or solder: For sealing seams and joints. Electromagnetic interference can leak through gaps.
- Insulating gloves and tools: Safety first when working with metal.
- Measuring tape and scissors or wire cutters: For precise cutting.
Conductive Mesh Options Compared
Not all mesh is the same. The table below compares the most common choices for a home generator shield.
| Material | Conductivity | Cost | Durability | Best For |
|---|---|---|---|---|
| Copper Mesh | Excellent | Higher | Good (may tarnish) | Maximum RF shielding and corrosion resistance |
| Galvanized Steel Mesh | Very Good | Lower | Excellent | Heavy-duty generator shielding on a budget |
| Aluminum Mesh | Good | Medium | Lightweight | Portable cages or smaller generators |
Grounding Components for Full Protection
Grounding is the most overlooked part of how to build a Faraday cage for a generator. Without it, the cage can still carry a charge. A grounding rod acts like a lightning rod for your cage. Drive it at least 8 feet into the soil near your build area. Connect the cage with a thick copper wire. This wire should be as short and straight as possible. Every conductive material in the cage needs to be bonded to the ground system.
Step-by-Step Guide to Building Your Own Faraday Cage
Now that you have your materials, follow these steps to build a solid DIY Faraday cage. Take your time and double-check each step.
Step 1: Measure and Cut the Cage Frame
Measure your generator’s length, width, and height. Add 6 inches to each side for airflow and mesh overlap. Cut your wooden base to these dimensions. For the frame, you can use wooden rails or metal brackets. The frame just needs to hold the mesh in shape. Make sure it’s sturdy enough to support the weight of the mesh and the generator.
Step 2: Attach the Conductive Mesh
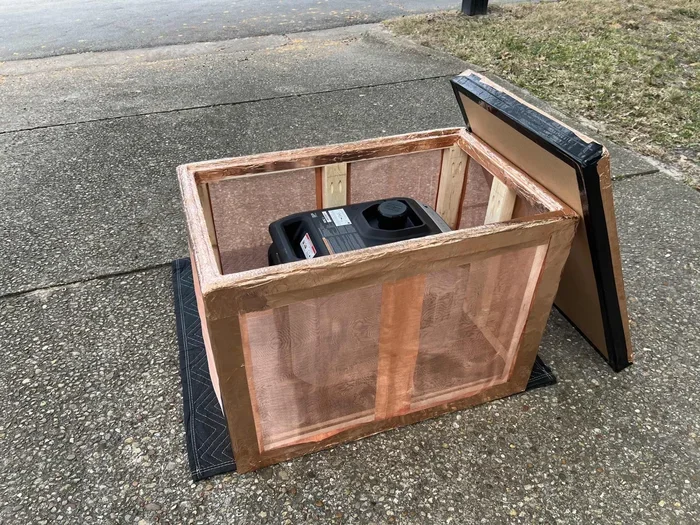
Wrap the mesh around the frame on all four sides and the top. Use staples, ties, or small bolts to secure it tightly. Overlap any seams by at least 2 inches. Electromagnetic interference can escape through tiny gaps, so overlap is crucial. If you’re using copper mesh, you can solder the seams for a permanent connection. For a removable cage, use conductive tape on the joints.
Step 3: Create an Insulated Interior Layer
Place a layer of rubber, thick cardboard, or plastic on the wooden base. The generator must never touch the conductive mesh directly. This insulating layer also adds a small cushion against vibrations. I like to use a rubber mat cut to size. It’s cheap and very effective for home generator protection.
Step 4: Install the Door and Grounding
Build a hinged or removable door on one side. Use a metal latch that presses the mesh tightly when closed. Attach the grounding wire to the mesh frame using a clamp. Run the wire to your grounding rod. Make sure the connection is clean and tight. A loose ground defeats the entire purpose of EMP protection.
Step 5: Seal All Edges for Full Coverage
Inspect every inch of the cage. Check for holes, loose wires, or gaps. Use conductive tape or additional mesh strips to seal them. Even a small opening can let radio frequency energy in. This is a common mistake, so be thorough. Once sealed, your Faraday enclosure is ready for testing.
Quick Tip: Use Overlapping Flaps
Think of the mesh like shingles on a roof. Overlapping layers force any electrical energy to travel through multiple paths, which strengthens the shield. This simple trick boosts the effectiveness of your generator shielding without extra cost.
Common Mistakes to Avoid When Building a Faraday Cage
Even a small error can ruin the shielding effect. Here are the most common mistakes people make when building a DIY Faraday cage.
- Using the wrong material: Plastic or wood alone won’t block electromagnetic energy. You need a continuous conductive layer.
- Forgetting to ground the cage: An ungrounded cage can still carry a dangerous charge. Always connect to a proper grounding rod.
- Leaving gaps in the seams: Tiny openings act as antennas for electromagnetic interference. Overlap and seal every joint.
- Letting the generator touch the metal: Direct contact can create a path for current to reach the device. Always use an insulating base.
- Using thin or flimsy mesh: A mesh with large holes won’t block higher frequencies. Choose a fine weave for full radio frequency shielding.
Avoiding these errors ensures your how to build a Faraday cage for a generator project actually works when you need it most.
How to Test Your Faraday Cage for Effective Shielding
After you build the cage, you should test it before placing your generator inside. Testing confirms that the Faraday enclosure is doing its job. You don’t need expensive lab equipment. A simple radio or a multimeter will do.
The Radio Frequency Test
Place a working radio inside the cage and close the door. Tune it to a strong station. If the signal drops to static or disappears, your cage is blocking radio frequency energy. If you still hear the station clearly, check the seams and grounding. A well-built DIY Faraday cage should block most FM and AM signals.
Using a Multimeter to Check Continuity
Set your multimeter to continuity mode. Touch one probe to the mesh and the other to the grounding rod. You should get a beep, showing a complete electrical path. This verifies that the cage is properly grounded and can conduct energy away. If there’s no continuity, recheck your wire connections and clamps.
Expert Insight: The Importance of a Full Seal
Professional engineers always say that generator shielding is only as good as its weakest point. A single unsealed seam can turn your cage into a placeholder. Take the extra time to inspect every edge. It’s the difference between a real EMP protection shield and a false sense of security.
Maintaining and Upgrading Your Generator Shield
A Faraday cage isn’t a set-and-forget project. Regular care keeps it effective for years. Here’s how to maintain and improve your build.
Regular Inspection Tips
- Check the mesh for rust or corrosion every few months. Clean it with a soft cloth and a light vinegar solution.
- Tighten any loose bolts or staples. Vibration from the generator can loosen connections over time.
- Inspect the grounding wire for breaks or corrosion. Replace it if you see any damage.
- Test the radio signal blocking once a season to confirm the shield is still working.
When to Upgrade Your Cage
If you upgrade to a larger generator, you’ll need a bigger Faraday enclosure. You can also add a second layer of mesh for extra EMF shielding. Some builders line the interior with conductive foam for even better magnetic field blocking. These upgrades are simple and can greatly extend the life of your home generator protection system.
Why Building Your Own Faraday Cage Is Worth the Effort
You might wonder if buying a pre-made Faraday cage for sale is easier. It can be, but a custom build offers real advantages. You control the size, the material, and the grounding. You also learn exactly how your generator shielding works, which gives you confidence during an emergency. A DIY Faraday cage can be disassembled, stored, and rebuilt whenever needed. That flexibility is hard to beat.
Protecting your generator means protecting your power independence. In a storm, a blackout, or any situation where electricity is scarce, you’ll be glad you took the time to build this shield. The steps are straightforward, the materials are affordable, and the payoff is enormous. Start your how to build a Faraday cage for a generator project today, and you’ll have a reliable safeguard for your most valuable power equipment.
The key is to take it step by step. Measure carefully, choose the right conductive mesh, and never skip the grounding. Seal every seam, test the shield, and maintain it regularly. By following this guide, you’ve built more than a cage—you’ve built peace of mind. Your generator is now ready to face electromagnetic pulse threats and power surges with confidence. Keep this generator shielding enclosure in good shape, and it will serve you for years to come.
Frequently Asked Questions
Can I use a metal trash can as a Faraday cage for a small generator?
A metal trash can can work for very small devices, but it’s not ideal for a full-size generator. The walls are often too thin, and the lid may not seal tightly. For reliable generator shielding, a purpose-built cage with fine mesh and proper grounding is much safer and more effective.
How thick does the conductive mesh need to be for EMP protection?
For most home EMP protection, a mesh with holes smaller than 1/8 inch works well. Copper or galvanized steel cloth with a fine weave blocks radio frequency energy effectively. The thickness of the wire itself matters less than the continuity of the mesh and the quality of the seams.
Do I need to ground the Faraday cage if it’s kept indoors?
Yes, grounding is still important even indoors. A surge from a nearby lightning strike or a power line event can enter through wiring or plumbing. A proper grounding rod gives that energy a safe path to the earth, protecting both your generator and your home.
Will a Faraday cage block the generator’s own electromagnetic field?
No, the cage is designed to block external fields. The generator’s own internal fields are contained within its normal operation and are not affected by the cage. The Faraday enclosure only redirects incoming energy from outside sources, so your generator runs normally inside.
Can I build a portable Faraday cage for camping or travel?
Absolutely. You can use lightweight aluminum mesh and a collapsible wooden frame. Just make sure the mesh is tightly woven and the seams are sealed with conductive tape. A portable DIY Faraday cage is a great way to bring surge protection on the go.
How often should I test my homemade Faraday cage?
Test it at least once every few months, or before you rely on it during a storm season. A quick radio signal check takes only a few minutes. Regular testing ensures that rust, loose connections, or wear haven’t compromised your home generator protection system.