How to Clean AC Compressor Coils for Better Cooling
Knowing how to clean AC compressor coils can dramatically improve your cooling system’s performance and energy efficiency. Dirty coils force your AC to work harder, raising bills and shortening equipment life. This guide walks you through every step, from gathering supplies to finishing touches, so you can tackle the job confidently at home.
Your air conditioning system works hard every day to keep your home comfortable. But there is one part of the process that many homeowners overlook: the compressor coils. These coils play a huge role in how well your AC cools your space. When they get dirty, everything suffers. If you have been wondering how to clean AC compressor coils, you are in the right place. This guide breaks down the entire process in simple, easy-to-follow steps.
Cleaning your compressor coils is not just a nice-to-have. It is essential maintenance that saves you money and keeps your system running smoothly. Dirty coils make your AC work harder, which drives up energy costs and can lead to breakdowns. Whether you are a DIY beginner or a seasoned home maintainer, learning how to clean AC compressor coils properly will pay off big time. Let us dive in.
Key Takeaways
- Clean coils improve cooling efficiency: Removing dirt and debris lets your AC transfer heat properly, keeping your home comfortable.
- You need basic tools only: A coil cleaner, garden hose, fin comb, and a few household items are all you need.
- Safety comes first: Always disconnect power before cleaning to avoid electrical hazards or accidental startup.
- Clean at least once a year: Regular maintenance prevents buildup and extends the life of your AC unit.
- Avoid common mistakes: Using a pressure washer or bending fins can cause costly damage that leads to expensive repairs.
- Call a pro when needed: Heavy buildup or refrigerant issues require professional diagnosis and service.
📑 Table of Contents
Why Cleaning AC Compressor Coils Matters
Your AC compressor coils are responsible for releasing heat from your home to the outside air. Over time, dust, pollen, leaves, and other debris build up on these coils. This layer of dirt acts like a blanket, trapping heat and making it harder for your system to cool effectively.
When your coils are dirty, several problems start to stack up:
- Reduced cooling capacity: Your home takes longer to cool down, and rooms feel warmer than they should.
- Higher energy bills: Your AC runs longer cycles to reach the set temperature, using more electricity.
- Increased wear and tear: The compressor works harder, which strains the entire system and shortens its lifespan.
- Poor air quality: Dirty coils can harbor mold and bacteria, which spread through your home’s air.
- System breakdowns: Overworked components are more likely to fail, leading to costly AC repair bills.
Think of it like changing the oil in your car. Regular cleaning keeps everything running at peak performance. If you also use a generator to power your AC during outages, clean coils mean your system uses less energy, so your generator does not have to work as hard. In fact, clean coils can even affect how long can a generator run on a tank of fuel, since a more efficient AC draws less power.
The Science Behind Coil Cleaning
AC compressor coils work by exchanging heat between the refrigerant inside and the air outside. The condenser coils release heat, while the evaporator coils absorb it. When dirt blocks the airflow around these coils, the heat exchange becomes inefficient. Your system struggles to complete the cooling cycle properly. Even a thin layer of grime can reduce efficiency by up to 30 percent. That is a big deal when you are trying to stay cool during a heatwave.
Tools and Materials You Will Need
Before you start, gather everything you need. Having the right tools makes the job faster, safer, and more effective. You do not need anything fancy, but using the correct supplies matters.
Essential Supplies
- Coil cleaner: A foaming no-rinse coil cleaner designed for AC units. You can find these at hardware stores or online.
- Garden hose with a gentle spray nozzle: You need low-pressure water to rinse the coils without bending the fins.
- Fin comb: This tool straightens bent fins on the coil surface, restoring proper airflow.
- Soft-bristle brush: For gently scrubbing away loose dirt and debris.
- Screwdriver or nut driver set: To remove the outer housing or access panels.
- Safety glasses and gloves: Protect your eyes from cleaner runoff and your hands from sharp fins.
- Compressed air can or blower: Optional, but helpful for blowing out loose debris before applying cleaner.
What to Avoid
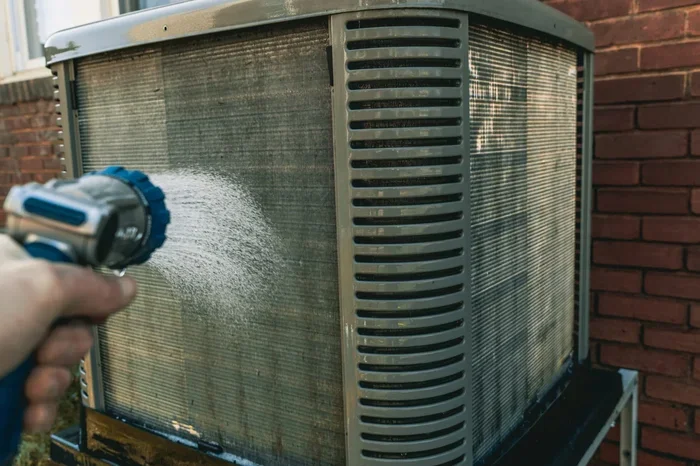
Do not use a pressure washer on your AC coils. The high pressure will bend and damage the delicate fins, making the problem worse. Also, avoid harsh chemicals like bleach or abrasive cleaners, as these can corrode the coil material. Stick with products made specifically for AC coil cleaning.
Step-by-Step Guide to Cleaning AC Compressor Coils
Now for the part you have been waiting for. Follow these steps carefully, and your compressor coils will look and perform like new.
Step 1: Turn Off the Power
Safety always comes first. Locate your outdoor AC unit and find the disconnect box near the condenser. Switch it off. You should also turn off the AC at your thermostat. This prevents any accidental startup while you are working on the coils. Never skip this step, even if you think the unit is off.
Step 2: Remove the Outer Housing
Use your screwdriver or nut driver to remove the screws holding the top grille or housing. Set the screws aside in a safe place so you do not lose them. Carefully lift off the top panel. Be gentle, as the fins are fragile and can bend easily.
Step 3: Clear Loose Debris
Before applying any cleaner, use your soft-bristle brush or compressed air to remove loose leaves, dirt, and cobwebs. Pay attention to the area around the fins and the base of the unit where debris tends to accumulate. This step makes the coil cleaner work more effectively.
Step 4: Apply Coil Cleaner
Shake your coil cleaner well and spray it evenly across the coil surface. Most foaming cleaners start to bubble and foam on contact, which helps lift dirt and grime. Work from top to bottom, covering all visible coil surfaces. Let the cleaner sit for the recommended time, usually about 5 to 10 minutes. You will see it dissolve and drip away as it works.
Step 5: Rinse Gently with Water
Using your garden hose on a gentle spray setting, rinse the coils from top to bottom. Use low pressure and a wide spray pattern. The goal is to wash away the dissolved dirt without bending the fins. Rinse thoroughly until the water runs clear and all cleaner residue is gone.
Step 6: Straighten Bent Fins
Inspect the fins closely after rinsing. If you notice any bent or damaged fins, use your fin comb to carefully straighten them. Slide the comb between the fins and gently pull in the direction of the fins. Take your time with this step. Straight fins are essential for proper airflow and maximum cooling efficiency.
Step 7: Replace the Housing and Restore Power
Once the coils are clean and dry, replace the outer housing or grille. Secure all screws tightly. Go back to your electrical disconnect box and switch the power back on. Then set your thermostat to cool and let your AC run for a few minutes. You should notice cooler air and shorter cooling cycles almost immediately.
After cleaning, your AC system will not only cool better but also use less energy. This is especially important if you rely on a generator during power outages. A well-maintained AC pulls less power, which means if you are running a what size generator to run a house, your AC will not demand as much from it. Clean coils can also reduce fuel consumption, which ties directly into how much gas does a generator use over the course of a summer.
Common Mistakes to Avoid When Cleaning AC Coils
Even with the best intentions, mistakes can happen. Here are the most common errors homeowners make when cleaning their compressor coils, and how to avoid them.
Using a Pressure Washer
This is the number one mistake. The high pressure from a pressure washer will bend and crush the delicate fins on your coils. Once fins are bent, airflow is restricted, and your AC loses efficiency. Stick with a gentle garden hose spray.
Skipping the Fin Comb
Some people clean the coils but ignore bent fins. Damaged fins block airflow just as much as dirt does. Always use a fin comb to restore the fins after cleaning.
Not Turning Off the Power
Working on a live unit is dangerous. Even if you are just spraying water, accidental activation can cause serious injury. Always disconnect power before you start.
Using the Wrong Cleaner
Not all coil cleaners are created equal. Some are too harsh and can corrode the aluminum or copper fins. Choose a cleaner specifically formulated for AC coils, and always read the label before applying.
Neglecting the Area Around the Unit
Cleaning the coils is important, but you also need to keep the area around the outdoor unit clear. Trim back vegetation, remove debris, and ensure at least two feet of clearance on all sides for proper airflow.
How Often Should You Clean Your AC Compressor Coils?
As a general rule, you should clean your AC compressor coils at least once a year, ideally before the start of the cooling season. However, certain factors may require more frequent cleaning:
- Heavy pollen seasons: If you live in an area with a lot of trees or plants, pollen can coat your coils quickly.
- Dusty or construction-heavy environments: Nearby building projects or unpaved roads kick up a lot of dust.
- Pet owners: Pet hair and dander can accumulate on coils faster than you might expect.
- Coastal areas: Salt air can cause corrosion and buildup on coils more rapidly.
- Units near trees: Falling leaves and sap can clog coils and drainage lines.
If you notice your AC is not cooling as well as it used to, or your energy bills have crept up, dirty coils might be the culprit. Checking your coils regularly helps you catch problems early before they turn into expensive repairs. Regular maintenance also keeps your warranty valid, since many manufacturers require proof of routine upkeep.
Think of coil cleaning as part of a broader air conditioning maintenance routine. Along with cleaning the coils, you should also change your air filters regularly, check your refrigerant levels, and inspect your ductwork for leaks. Together, these steps keep your entire system running at its best.
When to Call a Professional
Cleaning your compressor coils is a great DIY project for most homeowners. But there are times when you should call in a professional. Here are the signs that you need expert help:
- Heavy, caked-on dirt: If the coils have not been cleaned in years, the buildup may be too thick for a DIY approach.
- Refrigerant leaks: If you notice oily spots or hear hissing sounds near the coils, you may have a refrigerant leak that requires a licensed technician.
- Bent or damaged fins: If the fins are badly damaged, a professional can assess whether the coils need replacement.
- Persistent cooling problems: If your AC still does not cool well after cleaning, there may be a deeper issue like a faulty compressor or low refrigerant charge.
- Electrical concerns: Any time you are uncomfortable working with electrical components, it is always smart to hire a pro.
A professional HVAC technician has the tools, training, and experience to handle complex issues safely. They can also perform a full system inspection, checking things like refrigerant levels, electrical connections, and overall system health. Regular professional maintenance, combined with your own cleaning efforts, gives your AC the best chance of lasting for many years.
Benefits of Regular Coil Cleaning
Still not sure if cleaning your AC compressor coils is worth the effort? Here are the key benefits you can expect:
- Better cooling performance: Clean coils transfer heat more efficiently, so your home cools faster and more evenly.
- Lower energy bills: An efficient AC uses less electricity, which saves you money every month.
- Longer equipment life: When your AC does not overwork, components last longer and fail less often.
- Improved indoor air quality: Clean coils reduce the chance of mold and bacteria growth in your system.
- Fewer repairs: Regular maintenance catches small problems before they become big, expensive ones.
- Higher home value: A well-maintained AC system is a selling point if you ever decide to put your home on the market.
Taking care of your AC compressor coils is one of the simplest and most cost-effective things you can do as a homeowner. It takes about 30 to 45 minutes, costs very little in supplies, and delivers results you can feel right away. Make it part of your seasonal home maintenance routine, and your AC will thank you all summer long.
Remember, a well-maintained AC system works hand in hand with the rest of your home. If you use a backup generator, keeping your AC efficient means less strain on that generator too. Whether you are preparing for a summer outage or just trying to keep costs down, clean coils are a small step that makes a big difference.
Conclusion
Learning how to clean AC compressor coils is a valuable skill that every homeowner should have. It is simple, affordable, and incredibly effective. With the right tools and a little patience, you can keep your AC running at peak performance all season long. Clean coils mean better cooling, lower energy bills, and a longer-lasting system. So grab your supplies, follow the steps in this guide, and give your AC the care it deserves. Your home and your wallet will both thank you.
Frequently Asked Questions
Can I use a pressure washer to clean my AC compressor coils?
No. Pressure washers use too much force and will bend the delicate fins on your coils. Bent fins restrict airflow and reduce cooling efficiency. Always use a garden hose with a gentle spray nozzle instead.
How do I know if my AC compressor coils are dirty?
Signs of dirty coils include reduced cooling performance, longer running cycles, higher energy bills, and warm air coming from your vents. You can also visually inspect the coils and look for visible dirt, dust, or debris buildup on the surface.
What kind of coil cleaner should I use?
Use a foaming no-rinse coil cleaner specifically designed for AC units. These cleaners are safe for aluminum and copper fins and do not require rinsing in most cases, though a gentle water rinse is always a good practice.
Is it safe to clean AC coils myself?
Yes, as long as you follow safety precautions. Always turn off the power before cleaning, wear safety glasses and gloves, and use gentle water pressure. If you are uncomfortable with any step, it is perfectly fine to hire a professional.
How much does it cost to have a professional clean AC coils?
Professional coil cleaning typically costs between $100 and $300, depending on your location and the condition of your coils. This is a small price compared to the cost of repairing damage caused by neglected maintenance or a system breakdown during peak summer heat.
Can dirty AC coils cause a refrigerant leak?
Dirty coils do not directly cause refrigerant leaks, but they can contribute to problems that strain the system. Overworked components experience more stress, which can worsen existing weaknesses. If you suspect a refrigerant leak, contact a licensed HVAC technician right away.