How to Clean Your Air Compressor Tank the Right Way
Keeping your air compressor tank clean is essential for safety, performance, and longevity. This guide walks you through every step of cleaning your compressed air tank, from draining moisture to removing rust and buildup. You will learn the tools you need, the safest methods, and how often to maintain your tank.
This is a comprehensive guide about how to clean air compressor tank.
Key Takeaways
- Regular cleaning prevents rust and moisture buildup that can compromise your tank’s integrity and safety.
- Draining the tank after every use is the simplest and most effective maintenance habit you can adopt. Vinegar and baking soda are safe, affordable cleaning agents for removing internal rust and residue.
- Always release all pressure before opening the tank to avoid serious injury or equipment damage.
- Inspect your tank annually for cracks, corrosion, or structural damage that may require professional attention.
- Replacing your tank filter regularly works hand-in-hand with tank cleaning to keep your system running smoothly.
- Proper storage and humidity control** reduce the need for frequent deep cleanings.
[FEATURED_IMAGE_PLACEHOLDER]
Why Cleaning Your Air Compressor Tank Matters
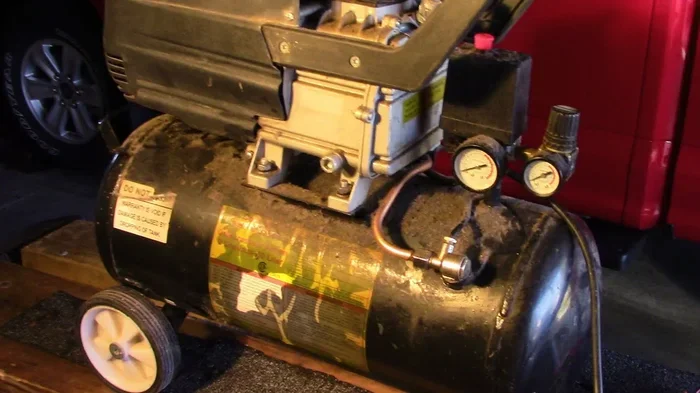
Your air compressor tank stores pressurized air that powers your pneumatic tools, inflation systems, and spray equipment. Over time, moisture, oil residue, and rust accumulate inside the tank. This buildup reduces efficiency and can create serious safety hazards. Cleaning your air compressor tank regularly ensures your equipment operates at peak performance and lasts for years.
Many compressor owners overlook tank maintenance until something goes wrong. By then, rust may have weakened the tank walls, or moisture may have contaminated your compressed air supply. Preventing these problems is far easier and cheaper than fixing them. A simple cleaning routine takes about 30 minutes and can extend your tank’s lifespan significantly.
Think of it like changing the oil in your car. You do it regularly because small maintenance prevents big problems. The same logic applies here. Routine tank cleaning keeps moisture from causing corrosion, ensures clean air output, and protects the pneumatic tools connected to your system.
Understanding How Moisture and Rust Build Up in Your Tank
When air enters your compressor, it carries humidity. As the air compresses, that moisture condenses and collects at the bottom of the tank. Left unchecked, this water triggers rust from the inside out. Understanding this process helps you appreciate why regular tank cleaning is so important.
The Condensation Cycle
Every time you run your compressor, the air inside heats up. When the compressor shuts off, the air cools down. This temperature drop causes water vapor to condense into liquid droplets. These droplets pool at the bottom of the tank. Over weeks and months, the water level rises and the rusting process begins.
In humid climates, this happens faster. If you use your compressor outdoors or in a garage without climate control, moisture accumulation accelerates. Even a small amount of standing water can cause significant internal corrosion over time. This is why draining your tank after every use is the single most important habit you can build.
How Rust Affects Tank Performance
Rust eats away at the inner walls of your tank. As the metal weakens, the tank loses structural integrity. In worst-case scenarios, a corroded tank can crack or even rupture under pressure. Beyond safety concerns, rust particles can contaminate your compressed air supply. This contaminates your paint jobs, damages sensitive pneumatic tools, and clogs your air filters faster than normal.
Some people assume their tank is fine because it still holds pressure. But internal corrosion can be advanced before any external signs appear. This is exactly why periodic deep cleaning and inspection are essential parts of your compressor maintenance routine.
Tools and Supplies You Will Need
Before you start cleaning, gather everything you need. Having the right supplies makes the process faster, safer, and more effective. You do not need anything fancy, but using the correct materials matters.
- Safety glasses and gloves to protect your eyes and hands from debris and chemicals
- A wrench set for removing the drain valve and access points
- Compressed air or an air blower to blow out loose debris
- White vinegar for dissolving rust and mineral deposits naturally
- Baking soda for neutralizing acid and polishing metal surfaces
- A stiff-bristle brush or pipe cleaner for scrubbing the interior walls
- Clean rags or shop towels for wiping down the exterior and interior
- Tank-safe lubricant or compressor oil for protecting clean metal surfaces
- A container or bucket to catch drained water and cleaning solution
Pro tip: if you have access to a pressure washer or a long-handled bottle brush, those tools make reaching the inside of larger tanks much easier. The goal is to remove all loose rust, sediment, and moisture without damaging the tank interior.
Step-by-Step Guide to Cleaning Your Air Compressor Tank
Now that you have your supplies ready, let us walk through the actual cleaning process. Follow these steps in order for the best results.
Step 1: Shut Off Power and Release All Pressure
Safety comes first. Unplug the compressor from the electrical outlet or turn off the gas supply if you use a gas-powered unit. Then, open the drain valve slowly to release all remaining pressure. Listen for the hissing sound to stop completely before proceeding. Never skip this step. Working on a pressurized tank is extremely dangerous and can cause serious injury.
It is also a good idea to check your pressure gauge to confirm it reads zero. Some gauges hold a small residual reading even after draining. Give the tank a few extra minutes to fully depressurize. This is also a good time to inspect the pressure release valve and make sure it is functioning properly.
Step 2: Drain All Water from the Tank
Locate the drain valve at the bottom of the tank. Place your bucket or container directly beneath it. Open the valve fully and let all the water flow out. You may be surprised by how much water comes out, especially if you have not drained the tank in a while.
Tip: tilt the tank slightly or use a compressed air blast to push out any remaining water trapped in low spots. Even small amounts of standing water accelerate rust formation. Make sure the tank is as dry as possible before moving to the next step. If you want to speed up drying, leave the valve open for a few hours in a warm, ventilated area.
Step 3: Prepare Your Cleaning Solution
For most tanks, a mixture of equal parts white vinegar and water works exceptionally well. Fill the tank about halfway with this solution. The acidity in vinegar breaks down rust and mineral deposits without harming the metal. For heavy rust buildup, you can let the solution sit overnight for deeper penetration.
If you prefer a more aggressive approach, you can add a tablespoon of baking soda to the vinegar solution. The fizzing reaction helps lift stubborn rust particles. Just be sure to rinse the tank thoroughly afterward to remove all cleaning residue. Never use harsh chemical solvents unless your tank manufacturer specifically recommends them, as these can degrade internal seals and coatings.
Step 4: Scrub the Interior Walls
After letting the cleaning solution sit for at least 30 minutes, use your stiff-bristle brush or pipe cleaner to scrub the interior walls. Work in circular motions and focus on areas with visible rust or buildup. For large tanks, a long-handled brush makes this job much easier on your back and arms.
Pay special attention to the bottom seam and the area around the drain valve. These spots collect the most sediment and are the most prone to rust. If you notice deep pitting or flaking metal, that is a sign of advanced corrosion. In such cases, you may need to repeat the cleaning process or consider professional assessment.
Step 5: Rinse and Dry Thoroughly
Once you have scrubbed the interior, drain the cleaning solution completely. Rinse the tank two to three times with clean water to remove all traces of vinegar and loosened rust. After the final rinse, leave the drain valve open and let the tank air dry completely. You can also use a clean rag to absorb excess moisture from accessible areas.
For the best results, leave the tank open and uncovered in a dry, well-ventilated space for several hours. Moisture trapped inside a freshly cleaned tank will undo all your hard work. Some users even use a hair dryer or heat gun on a low setting to speed up the drying process, but be careful not to apply too much heat to the metal.
Step 6: Apply a Protective Coating (Optional)
For extra protection, you can apply a thin layer of compressor-safe oil or a rust inhibitor to the clean interior walls. This creates a barrier against future moisture and slows down the rusting process. Use only products recommended by your compressor manufacturer. Too much oil can contaminate your compressed air supply and affect your pneumatic tools.
Some compressor owners also apply a food-grade compressor oil inside the tank. This is especially useful for tanks used in food preparation or painting applications where air purity matters. Check your owner’s manual for specific recommendations on protective coatings and lubricants.
How Often Should You Clean Your Compressor Tank?
The frequency of cleaning depends on how often you use your compressor and the environmental conditions you operate in. As a general rule, drain the tank after every use and perform a full deep cleaning at least once every three to six months.
If you live in a humid area or use your compressor daily, you may need to clean more frequently. Similarly, if you notice rust forming quickly or your air output seems weaker than usual, it is time for a cleaning session. Think of tank cleaning as part of your broader air compressor maintenance schedule alongside oil changes, filter replacements, and hose inspections.
Here is a simple maintenance timeline to follow:
- After every use: Drain all moisture from the tank by opening the drain valve
- Weekly: Wipe down the exterior and inspect for visible rust or damage
- Monthly: Check the drain valve, pressure gauge, and safety release valve for proper function
- Every 3-6 months: Perform a full deep cleaning using the vinegar method described above
- Annually: Have a professional inspect the tank for structural integrity, especially if you use it heavily
Following this schedule keeps your tank in excellent condition and helps you avoid costly repairs or premature tank replacement. The same principle applies to maintaining other workshop equipment. Just as you would care for a Generac generator with regular upkeep, your compressor tank benefits from consistent attention.
Common Mistakes to Avoid When Cleaning Your Tank
Even with good intentions, people make mistakes during the tank cleaning process. Here are the most common ones and how to avoid them.
Skipping the Pressure Release
This is the most dangerous mistake. Never open the tank or drain valve while the tank is still pressurized. Always confirm the pressure gauge reads zero and the tank has fully depressurized. Residual pressure can cause the valve or drain to blow out unexpectedly, leading to serious injury.
Using Harsh Chemicals
Strong solvents and industrial cleaners may seem like they will work faster, but they can damage the tank’s interior coating and seals. Stick with vinegar, baking soda, and water for safe, effective cleaning. Your tank manufacturer can advise on approved cleaning products if you are dealing with severe rust.
Not Drying the Tank Completely
Leaving moisture inside after cleaning is counterproductive. The whole point of cleaning is to remove moisture and prevent rust. If you do not dry the tank thoroughly, you are just setting the stage for the same problems to return faster. Take the extra time to let the tank air dry completely before closing it up.
Ignoring External Rust
While you are cleaning the interior, do not neglect the outside of the tank. External rust can spread inward and compromise the tank structure. Sand down any surface rust, apply a rust converter, and finish with a protective paint designed for metal surfaces.
Overlooking the Drain Valve
The drain valve itself can become clogged with rust and sediment. During your cleaning, remove the valve and inspect it closely. Clean or replace it if needed. A clogged drain valve prevents future water from escaping, which leads right back to moisture buildup and corrosion.
Expert Tips for Long-Term Tank Care
Beyond regular cleaning, a few extra habits can keep your compressor tank in excellent shape for many years. These tips come from experienced technicians and seasoned compressor users.
First, consider installing an in-line moisture trap or air dryer on your compressor output. These devices remove moisture from the compressed air before it even enters the tank, significantly reducing condensation buildup. This is especially helpful if you live in a humid climate or use your compressor in an unconditioned space.
Second, store your compressor in a dry, temperature-controlled environment whenever possible. Extreme temperature swings increase condensation, and humid environments accelerate rust. If you must store your compressor in a garage or workshop, use a compressor cover and run a dehumidifier in the room.
Third, keep an eye on your compressor’s air filter and intake. A clogged filter forces the compressor to work harder, which increases heat and moisture production inside the tank. Regularly cleaning or replacing the filter is a small step that pays big dividends in tank health.
Finally, document your maintenance activities. Keep a log of when you drained the tank, cleaned it, and replaced any parts. This record helps you spot patterns and stay on top of your maintenance schedule. It also adds value if you ever decide to sell the compressor, since a well-documented maintenance history builds buyer confidence.
Just like knowing how much fuel your generator uses helps you plan for operation costs, understanding your compressor’s maintenance needs helps you budget for parts and upkeep. Prevention is always cheaper than repair.
When to Replace Your Tank Instead of Cleaning It
Cleaning can work wonders, but it cannot fix everything. If your tank shows any of the following signs, cleaning alone will not be enough and replacement is the safer choice:
- Deep pitting or holes in the tank walls visible after cleaning
- Cracks or splits along any seam or weld joint
- Significant wall thinning that you can feel by gently pressing on the metal
- Persistent leaks that return even after tightening or sealing connections
- Excessive rust that returns within weeks of cleaning, indicating the metal is compromised
A compromised tank is a safety risk. No cleaning method can restore structural integrity to a damaged tank. If you notice any of these warning signs, stop using the compressor immediately and replace the tank or the entire unit. The cost of a new tank is far less than the cost of a tank failure.
When shopping for a replacement, consider the tank size, material, and compatibility with your compressor model. Just as you would carefully choose the right generator for your needs, selecting the right compressor tank ensures safe, efficient operation for years to come.
Conclusion
Cleaning your air compressor tank is a straightforward task that delivers big rewards. Regular draining, periodic deep cleaning, and proper inspection keep your tank safe, efficient, and long-lasting. The process takes just a little time and effort, but it protects your investment and keeps your pneumatic tools running at their best.
Start by building the habit of draining your tank after every use. Then schedule a full deep cleaning every few months using the vinegar and baking soda method we outlined above. Pair this with regular inspections and proper storage, and your compressor tank will serve you reliably for many years to come. Remember, maintenance today prevents costly repairs tomorrow. Take the time to care for your equipment now, and it will reward you with consistent, safe performance every time you power up.
Frequently Asked Questions
Can I use bleach to clean my air compressor tank?
It is best to avoid bleach. Bleach is a harsh chemical that can damage the interior coating and seals of your tank. Stick with white vinegar and baking soda, which are safe, effective, and affordable alternatives for removing rust and residue.
How do I know if my compressor tank has rust inside?
Signs of internal rust include discolored air output, reduced air pressure, and visible rust particles when you drain the tank. You can also remove the drain valve and use a flashlight to inspect the interior. If you see orange or brown deposits, rust has already begun to form.
Is it safe to use a pressure washer to clean the tank interior?
Using a pressure washer on the exterior is fine, but avoid directing high-pressure water inside the tank. Excessive pressure can damage seals and push water into areas that are hard to dry. Stick with the vinegar soak and manual scrubbing method for interior cleaning.
What happens if I do not drain my compressor tank regularly?
Standing water accelerates rust formation, weakens the tank walls, and contaminates your compressed air supply. Over time, this can lead to reduced tool performance, damaged equipment, and in severe cases, tank failure or rupture. Always drain the tank after every use.
Can I paint the inside of my compressor tank to prevent rust?
Only use coatings specifically rated for compressor tanks and approved by the manufacturer. Standard paint can flake off and contaminate your air supply. Some manufacturers offer tank-safe interior coatings designed to prevent corrosion without compromising air quality.
How much does it cost to replace a damaged compressor tank?
Replacement costs vary widely depending on tank size and model. A standard replacement tank can range from $100 to $500 or more. This is why regular cleaning and maintenance are so important. Preventive care is always cheaper than replacement, much like maintaining a home generator to avoid costly emergency repairs.