Air Compressor Pressure Switch Adjustment Made Simple
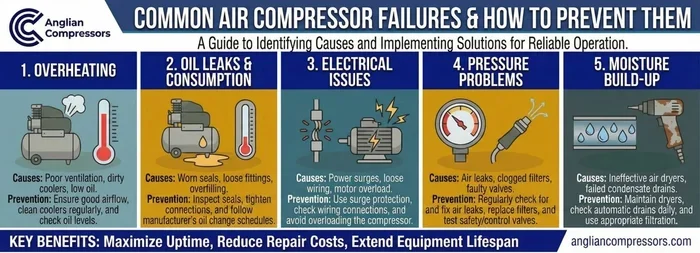
Adjusting your air compressor pressure switch is one of the simplest maintenance tasks that keeps your compressor running safely and efficiently. This guide walks you through every step, from understanding how the switch works to making the actual calibration. You will learn the right pressure settings, avoid common mistakes, and extend the life of your machine with easy tips.
Keeping your air compressor pressure switch adjustment dialed in is one of the most important things you can do for your compressor’s health and performance. Many people overlook this simple task, but getting the pressure settings right can mean the difference between a machine that runs smoothly for years and one that breaks down too soon. Whether you are a weekend warrior in the garage or a professional contractor, understanding how to adjust your pressure switch puts you in control of your equipment.
In this guide, we will walk you through everything you need to know. You will learn what the switch does, why the settings matter, and exactly how to make the adjustment yourself. We will also cover common problems, safety tips, and expert advice that most guides skip. By the end, you will feel confident making these adjustments on your own.
The process is simpler than most people think. You do not need advanced mechanical skills or expensive tools. A few basic items and about fifteen minutes of your time is all it takes. Let us get into it.
Key Takeaways
- Know Your Settings: Understanding cut-in and cut-out pressure is essential for proper adjustment.
- Safety First: Always disconnect power before working on your pressure switch.
- Use the Right Tools: A simple screwdriver and pressure gauge make the job easy.
- Check Regularly: Routine inspection prevents costly compressor failures.
- Match Your PSI Range: Setting the correct pressure range protects your tank and motor.
- Call a Pro When Needed: Some issues require professional diagnosis and repair.
📑 Table of Contents
- What Is an Air Compressor Pressure Switch?
- Why Adjusting Your Pressure Switch Matters
- Tools You Will Need for the Adjustment
- Step-by-Step Pressure Switch Adjustment Process
- Common Pressure Switch Problems and How to Fix Them
- Quick Tips for Better Adjustment Results
- Common Mistakes to Avoid
- Expert Insights for Long-Lasting Switch Performance
- Final Thoughts
What Is an Air Compressor Pressure Switch?
The pressure switch is the brain behind your compressor’s on-and-off cycle. It monitors the tank pressure and tells the motor when to start and stop. Without it, your compressor would run constantly, waste energy, and eventually overheat.
How the Switch Works
Here is how it works in simple terms. When you use compressed air, the pressure inside the tank drops. The pressure gauge on the tank shows this drop. Once the pressure falls to a certain level, called the cut-in pressure, the switch triggers the motor to start pumping. When the tank reaches the top level, called the cut-out pressure, the switch shuts the motor off.
This cycle repeats every time you use air. The pressure differential is the gap between the cut-in and cut-out numbers. For example, if your cut-in is 100 PSI and your cut-out is 150 PSI, the differential is 50 PSI. Understanding this gap is key to making the right pressure switch adjustment.
Key Components You Should Know
Before you touch anything, it helps to know the main parts of the switch:
- The diaphragm – This flexible piece moves with air pressure changes. It is what physically triggers the switch.
- The spring – This provides resistance against the diaphragm. Adjusting the spring changes your pressure settings.
- The contacts – These are electrical connections that tell the motor to start or stop.
- The unloader valve – This releases trapped air from the pump when the motor stops. It makes starting easier.
- The reset button – This is a safety feature that trips if the switch overheats or malfunctions.
Knowing these parts makes the adjustment process much less intimidating. Each component plays a role in the air compressor pressure switch adjustment process.
Why Adjusting Your Pressure Switch Matters
You might wonder why you need to adjust the switch at all. Most compressors come pre-set from the factory. But those factory settings are not always perfect for every situation. Here is why making the right adjustment matters.
The Role of Cut-In and Cut-Out Pressure
The cut-in pressure is the lower limit where the motor kicks on. The cut-out pressure is the upper limit where it shuts off. Setting these correctly ensures your compressor delivers enough air without overworking the motor.
If your cut-in is too low, the compressor runs too often and wears out faster. If your cut-out is too high, you put unnecessary strain on the tank and connections. Finding the sweet spot saves energy, reduces wear, and keeps your tools running at full capacity.
How Incorrect Settings Waste Energy and Money
Wrong pressure settings cost you real money. A compressor that runs too long wastes electricity. One that cycles too frequently wears out the motor prematurely. Both scenarios lead to higher bills and earlier replacements.
Here is a quick comparison of common settings and their effects:
| Setting Type | Typical Range | Effect of Incorrect Setting |
|---|---|---|
| Cut-In Pressure | 90-120 PSI | Too low = frequent cycling; too high = insufficient air supply |
| Cut-Out Pressure | 120-175 PSI | Too low = motor never reaches full power; too high = tank strain |
| Pressure Differential | 20-40 PSI | Too wide = excessive running; too narrow = short cycling |
As you can see, getting the numbers right makes a big difference. If you are running your compressor off a portable power source, make sure your power supply can handle the draw. For guidance on matching power sources to your equipment, check out this resource on what size generator for a 30 amp RV air conditioner to understand power requirements better.
Quick Tips for Understanding Your PSI Range
- Always check your compressor’s manual for the recommended PSI range.
- Never exceed the tank’s maximum rated pressure.
- Use a separate pressure gauge to verify the switch readings.
- Write down your settings after adjustment so you can return to them if needed.
Tools You Will Need for the Adjustment
One of the best things about adjusting a pressure switch is that you do not need a lot of tools. Most people already have everything they need at home. Here is what you will want to gather before you start.
Essential Tools
- Flathead and Phillips screwdrivers – You will need these to access and turn the adjustment screws.
- A reliable pressure gauge – This lets you verify the current and new settings accurately.
- A multimeter – Useful for checking electrical connections before and after the adjustment.
- A flashlight – The inside of the switch can be dark, and you want to see what you are doing.
- A notebook and pen – Record your original settings before making any changes.
Safety Gear You Should Never Skip
Working on any compressed air system involves real risks. Do not skip these safety items:
- Safety glasses – Protect your eyes from any unexpected air release.
- Work gloves – The tank and fittings can be sharp or hot.
- Ear protection – Compressors can be loud, especially during testing.
Before you begin any work, make sure you understand the electrical connections on your unit. If anything looks damaged or corroded, address that first. You can also learn more about proper power setup for your compressor by reading about matching your power supply to your compressor for safe operation.
Step-by-Step Pressure Switch Adjustment Process
Now for the part you have been waiting for. Here is the full process for adjusting your pressure switch. Follow each step carefully and do not skip anything.
Step 1: Turn Off the Power Completely
This is the most important step. Unplug the compressor from the wall outlet. If your unit is hardwired, turn off the breaker that supplies power. Never work on a compressor that has power flowing to it. This is not a place to take shortcuts.
After disconnecting power, release all tank pressure. Open the drain valve and let the air out completely. You should hear the tank depressurize. Wait until the gauge reads zero before moving forward.
Step 2: Locate the Pressure Switch
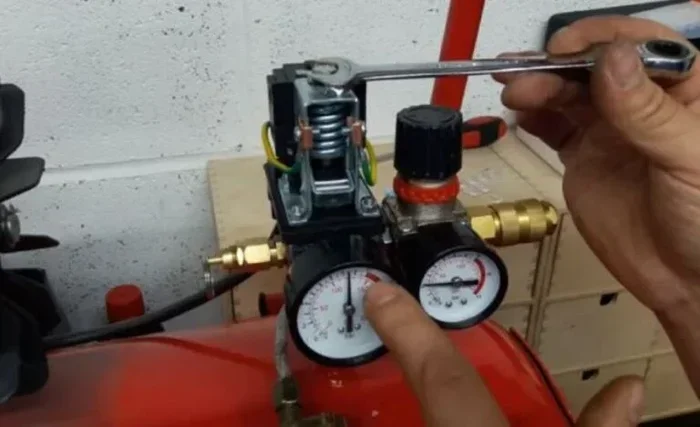
The pressure switch is usually a box-shaped component mounted near the tank or on the pump housing. It will have electrical wires connected to it and one or two adjustment screws on top. If you are unsure, refer to your compressor’s manual. The manual will show you exactly where the switch is located.
Take a moment to examine the switch before touching anything. Look for any signs of damage, corrosion, or loose wires. If anything looks wrong, it is best to call a professional rather than risk making things worse.
Step 3: Adjust the Cut-In Pressure
The cut-in pressure screw is typically the larger of the two screws on top of the switch. It is often labeled or colored differently from the other screw. Use your screwdriver to turn it clockwise to increase the cut-in pressure or counterclockwise to decrease it.
Here is the process:
- Connect a pressure gauge directly to the tank fitting.
- Turn on the compressor and let it build pressure naturally.
- Watch the gauge closely as pressure rises.
- When the motor starts, note the PSI reading. This is your current cut-in.
- Turn off the compressor and release the pressure.
- Make your adjustment by turning the cut-in screw a small amount.
- Repeat the test to verify the new setting.
Make small adjustments. Turning the screw just a quarter turn at a time is usually enough. Big jumps can cause problems with your compressor motor and shorten its lifespan.
Step 4: Adjust the Cut-Out Pressure
The cut-out pressure screw controls when the motor stops. The process is similar to adjusting the cut-in:
- Turn on the compressor and let it build pressure.
- Watch the gauge as pressure rises.
- When the motor stops, note the PSI reading. This is your current cut-out.
- Turn off the compressor and release pressure.
- Adjust the cut-out screw a small amount.
- Repeat the test to confirm the new setting.
Remember that the pressure differential between cut-in and cut-out should stay within your manufacturer’s recommended range. A typical differential is about 20 to 40 PSI. If you change one setting significantly, you may need to adjust the other to maintain a healthy differential.
Keep in mind that your electrical setup matters here too. If you are running your compressor on a generator, the power draw changes with pressure settings. For more information on sizing your power source correctly, you can refer to our guide on sizing a generator for compressor use to make sure your setup can handle the load.
Step 5: Test Your New Settings
Once you have made both adjustments, it is time to test. Plug the compressor back in or restore power. Let it run through a full cycle several times. Watch for these things:
- Does the motor start at the correct cut-in pressure?
- Does it stop at the correct cut-out pressure?
- Is the cycling smooth and consistent?
- Are there any unusual sounds or vibrations?
- Does the unloader valve release air properly when the motor stops?
If everything looks and sounds normal, you have successfully completed your air compressor pressure switch adjustment. Write down your new settings on a piece of tape stuck to the switch for future reference.
Common Pressure Switch Problems and How to Fix Them
Even with careful adjustment, pressure switches can develop problems over time. Here are the most common issues and what you can do about them.
Switch Not Engaging
If your compressor does not start when the tank pressure drops to the cut-in level, the switch may not be engaging properly. This can happen for several reasons:
- The contacts inside the switch are worn or corroded.
- The diaphragm has a small tear or crack.
- The spring tension is set too high.
- There is a wiring issue preventing the electrical signal from reaching the motor.
Start by checking the electrical connections. Sometimes a loose wire is all it takes. If the connections look good, you may need to replace the switch entirely. Pressure switches are relatively inexpensive and easy to swap out.
Compressor Runs Continuously
A compressor that never shuts off is a serious problem. It usually means the switch is not detecting the correct cut-out pressure. Common causes include:
- A faulty diaphragm that cannot sense pressure properly.
- A stuck or jammed contact point.
- The cut-out adjustment has been set too high or has loosened over time.
- A leak in the system that prevents pressure from building up correctly.
Running continuously will overheat the motor quickly. If this happens, turn off the compressor immediately and investigate. Continuing to run it can cause permanent damage to the compressor motor and the tank.
Pressure Leaks Around the Switch
If you hear air hissing from around the switch housing, you have a leak. This is often caused by:
- Worn or damaged seals around the switch fitting.
- A loose connection between the switch and the tank.
- Cracks in the switch housing itself.
Tighten connections first and see if that resolves the issue. If the leak persists, you will likely need to replace the seals or the entire switch assembly. Do not ignore air leaks. They reduce efficiency and can be a safety hazard.
Quick Tips for Better Adjustment Results
Here are some practical tips that will help you get the best results every time you adjust your pressure switch:
- Always adjust when the tank is empty. This gives you the most accurate readings and the safest working conditions.
- Make one adjustment at a time. Change either the cut-in or the cut-out, then test before adjusting the other. This makes it easier to isolate any problems.
- Use quality tools. A cheap screwdriver can strip the adjustment screws. Invest in a good set and keep them in your compressor toolkit.
- Take photos before you start. Photograph the switch and wiring before making any changes. This makes it easy to return to the original setup if needed.
- Adjust in small increments. Quarter turns are usually the sweet spot. You can always make another small adjustment, but undoing a big one is frustrating.
Common Mistakes to Avoid
Even experienced DIYers make mistakes when adjusting pressure switches. Here are the ones to watch out for:
- Skipping the power-off step. This is dangerous and should never be skipped, even for a quick check.
- Making too large an adjustment at once. Big changes can shock the system and cause the motor to stall.
- Ignoring the pressure differential. Changing one setting without considering the other throws off the entire cycle.
- Forgetting to release tank pressure. Residual pressure can cause injuries or inaccurate readings.
- Using the wrong tools. Improper tools can damage the switch screws or electrical connections.
- Not testing after adjustment. Always run at least two full cycles to confirm your settings are correct.
Avoiding these mistakes will keep you safe and ensure your air compressor pressure switch adjustment is effective and lasting.
Expert Insights for Long-Lasting Switch Performance
Experienced compressor technicians share a few insights that go beyond the basic adjustment process. These tips can help you get the most out of your equipment.
Regular Maintenance Checks
Do not wait for something to go wrong before you check your pressure switch. A simple monthly inspection can catch small problems before they become big ones. Here is a quick maintenance checklist:
- Visually inspect the switch for any signs of corrosion or damage.
- Check that all electrical connections are tight and free of debris.
- Test the reset button to make sure it still functions properly.
- Verify that the safety relief valve is working and not stuck.
- Clean the switch housing to prevent dust and debris buildup.
Taking ten minutes each month for these checks can add years to the life of your compressor. It also keeps you safer during every use.
When to Call a Professional
There are times when a professional is the right call. If you have adjusted the switch correctly but the compressor still behaves abnormally, something else may be wrong. Signs that you need expert help include:
- The switch trips repeatedly even after a proper adjustment.
- You notice burning smells or visible damage to electrical components.
- The compressor makes unusual grinding or knocking sounds.
- Pressure builds very slowly even with no air being used.
A qualified technician can diagnose issues that go beyond simple switch adjustment. It is always better to be safe than sorry when dealing with compressed air systems and electrical components.
Final Thoughts
Adjusting your air compressor pressure switch adjustment is a skill that pays off every time you use your compressor. It keeps your machine running efficiently, protects your tank and motor, and saves you money on energy bills. The process is straightforward once you understand the basics, and it only takes a few minutes once you have done it a couple of times.
Remember to always prioritize safety. Disconnect power, release tank pressure, and work carefully. Make small adjustments, test thoroughly, and do not hesitate to call a professional if something does not feel right. With the tips and steps in this guide, you have everything you need to keep your compressor running at its best for years to come.
Take a few minutes today to check your pressure switch settings. Your compressor will thank you with reliable performance every single time you need it.
Frequently Asked Questions
How do I know if my pressure switch needs adjustment?
If your compressor cycles too frequently, runs continuously, or fails to reach the expected pressure, the switch likely needs adjustment. You may also notice inconsistent tool performance or unusual noises during operation. A simple test with a pressure gauge can confirm whether your settings are off.
Can I adjust the pressure switch myself?
Yes, adjusting the pressure switch is a straightforward DIY task that most homeowners can handle. You only need basic tools like a screwdriver and a pressure gauge. Just make sure to disconnect power and release tank pressure before starting any work.
What is the correct PSI range for a typical home compressor?
Most home compressors operate between 90 and 150 PSI, with a common cut-in around 100 PSI and cut-out around 150 PSI. However, always check your specific model’s manual for the recommended range. Going outside the manufacturer’s guidelines can damage the tank or motor.
What happens if I set the pressure too high?
Setting the pressure too high puts excessive strain on the tank, seals, and motor. It can lead to premature wear, leaks, or even a dangerous tank failure. Always stay within the rated maximum pressure listed on your compressor’s nameplate.
How often should I check my pressure switch settings?
A monthly check is ideal for regular users. Even if your compressor sits idle for weeks, it is good practice to verify the settings before heavy use. Seasonal users should check the switch at the start of each working season.
What should I do if the reset button keeps tripping?
A tripping reset button usually indicates an electrical issue, overheating, or a faulty switch. Check for loose wiring, ensure the compressor is not overloaded, and verify that the tank pressure is within the normal range. If the problem persists, consult a professional technician.